
Your Pi-hole can see your work laptop. So can that Ubuntu VM you spun up to test something sketchy, and the Home Assistant box, and anything else you’ve built since Part 1. One flat network, everything talking to everything.
That’s how Proxmox ships, and it’s fine for one VM. It stops being fine fast.
Proxmox networking runs on three building blocks. A bridge is a virtual switch your VMs plug into. A VLAN splits that switch into isolated segments. A bond glues two physical NICs together for redundancy or throughput. Get those three right and everything else is detail.
This is Part 2 of our Proxmox homelab series. In Part 1 you installed Proxmox VE on bare metal and booted your first Ubuntu VM. That VM is sitting on the default vmbr0 bridge right now, sharing one broadcast domain with every device in your house.
Here’s what you’ll build:
- Read your current
/etc/network/interfacesand understand what the installer wrote for you. - Turn
vmbr0into a VLAN-aware bridge so any VM can sit on any VLAN with one config field. - Bond two NICs with LACP for redundancy, then hang the bridge off the bond.
- Turn on the firewall at the datacentre, node, and VM level (all three, or it does nothing).
- Pin your interface names so a kernel upgrade doesn’t rename a NIC and lock you out.
One version note before the configs. Proxmox VE 9.2 is the current release as of August 2026, out on 2026-05-21 with Debian 13.5, kernel 7.0, QEMU 11.0, LXC 7.0, and ZFS 2.4 (Proxmox roadmap). Part 1 was written against 9.1. The networking syntax below is identical on both, but the interface-pinning tool in step 5 matters much more on 9.x than it did on 8.x, so read that section even if you skim the rest.
This is the same ground we cover in our Proxmox VE training programme with live instructor time, where students break their own configs and we fix them together. Let’s get into it.
How does Proxmox networking actually work?
Proxmox uses plain Debian networking underneath. No proprietary virtual switch, no vendor abstraction layer. Your entire host network config lives in one text file at /etc/network/interfaces, and the web UI is a front end that writes to it. Every config example below comes from the official Proxmox network configuration docs.
That’s genuinely good news. Everything you learn here is transferable Linux networking knowledge, and it means you can fix a broken config from a rescue shell without a GUI.
Open the file on your host and you’ll see roughly what the installer wrote in Part 1:
auto lo
iface lo inet loopback

iface eno1 inet manual

auto vmbr0
iface vmbr0 inet static
        address 192.168.1.100/24
        gateway 192.168.1.1
        bridge-ports eno1
        bridge-stp off
        bridge-fd 0
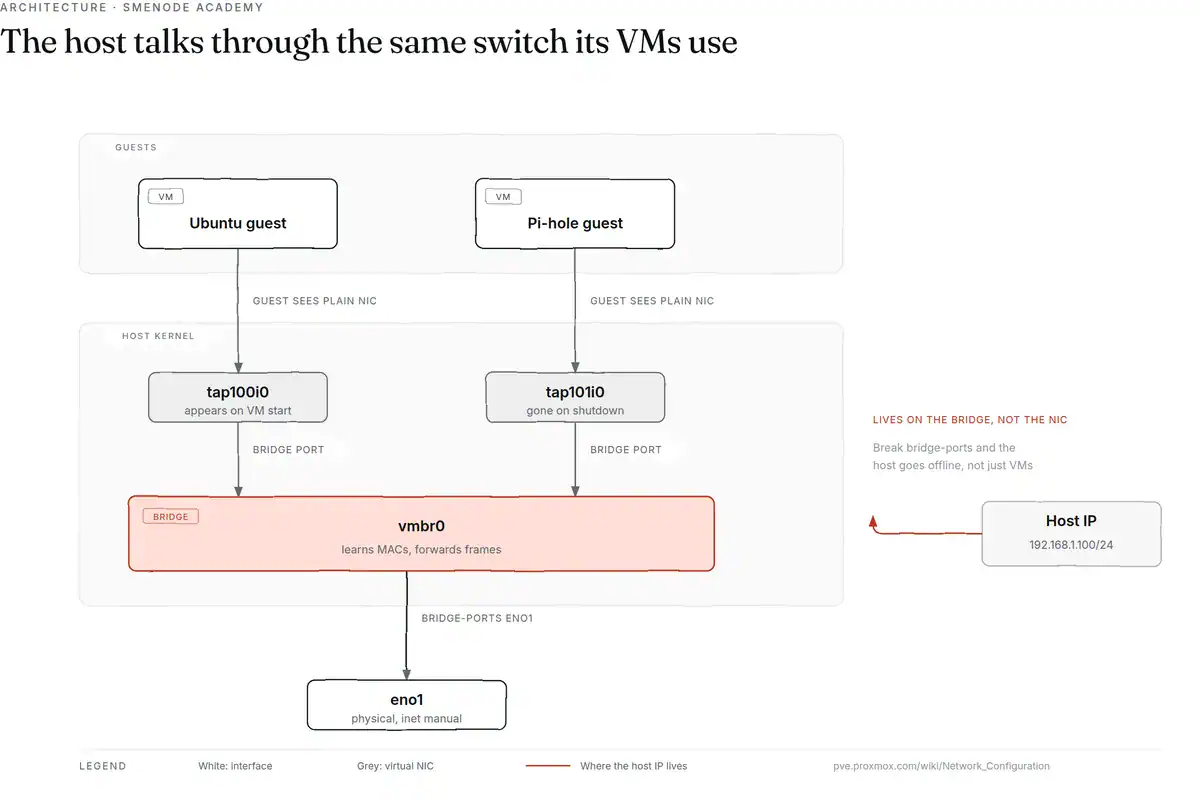
Three things are happening. eno1 is your physical NIC set to manual, meaning it gets no IP of its own. vmbr0 is a Linux bridge that took the host IP instead. And bridge-ports eno1 is the line that plugs the physical NIC into the bridge.
So your host doesn’t talk to the network directly. It talks through the same virtual switch its VMs use.
Worth understanding, because it explains why a broken bridge-ports line takes the whole host offline, not just the VMs. Remember that when you get to the NIC rename section.
The staging file that saves you
Proxmox never edits the live file when you click things in the GUI. It writes to /etc/network/interfaces.new and waits for you to hit Apply Configuration.
That’s a safety net. Make a mess in the GUI, don’t apply it, reboot, and nothing changed. It also means edits you make in the GUI won’t take effect until you apply them, which trips people up constantly when they swear they changed something and nothing happened.
To apply changes from the shell without a reboot:
ifreload -aThat command comes from ifupdown2, which has been the default for new installs since Proxmox VE 7.0. One catch worth knowing: if you installed Proxmox on top of plain Debian, or you’ve upgraded the same host along a chain from an old version, it may not be there. Check with apt install ifupdown2 before you rely on ifreload.
Bridges: your virtual switch
A Linux bridge is a software switch. It has ports, it learns MAC addresses, it forwards frames. Same mental model as the switch in your networking textbook, just running in the kernel.
vmbr0 is the one the installer made for you. You can have up to 4094 of them, named vmbr0 through vmbr4094, and the naming is not optional. Proxmox looks for that exact prefix.
When you attach a VM to vmbr0, Proxmox creates a virtual NIC (a tap device) and plugs it into the bridge. The VM behaves as if it were cabled directly to your physical network, pulling an IP from your router’s DHCP like any other device.
The docs describe that tap device as “a software loopback device simulating an Ethernet NIC,” and you can watch it appear. Run ip link on the host with one VM running, start a second VM, and run it again: a new tap interface shows up, named after the VM and its NIC index. Shut a VM down and its tap disappears. The bridge is doing exactly what a physical switch does when you unplug a cable.
That model explains two behaviours that confuse people:
- Your VMs can reach each other even if your router is down. The bridge forwards locally, so two VMs on
vmbr0in the same subnet keep talking with no gateway involved. - Broadcast traffic reaches everything. A VM running a DHCP server will happily hand out addresses to your TV. One flat bridge means one broadcast domain, which is the actual argument for the VLANs later in this article.
When you need a second bridge
One bridge is plenty for a starter homelab. You’d add a second one when you want a network that is genuinely separate from your LAN, with no physical NIC attached at all:
auto vmbr1
iface vmbr1 inet static
        address 10.10.10.1/24
        bridge-ports none
        bridge-stp off
        bridge-fd 0
Note bridge-ports none. No physical NIC, so nothing on this bridge can reach your LAN or the internet unless you deliberately route it. That’s the point.
This is the pattern for a CCNA lab where you want routers talking to each other on an isolated segment, or a malware analysis box you don’t want phoning home. Two VMs on vmbr1 can talk to each other and to nothing else.
It’s also the one VLAN-adjacent setup that needs no switch support whatsoever, which matters if you’re on an unmanaged switch. More on that shortly.
VLANs: splitting one switch into many
A VLAN tags Ethernet frames with a number so one physical link can carry several logically separate networks. Your managed switch keeps VLAN 10 traffic away from VLAN 20 even though both ride the same cable.
Proxmox gives you two ways to do this. Pick one and understand why.
Method 1: VLAN-aware bridge (do this one)
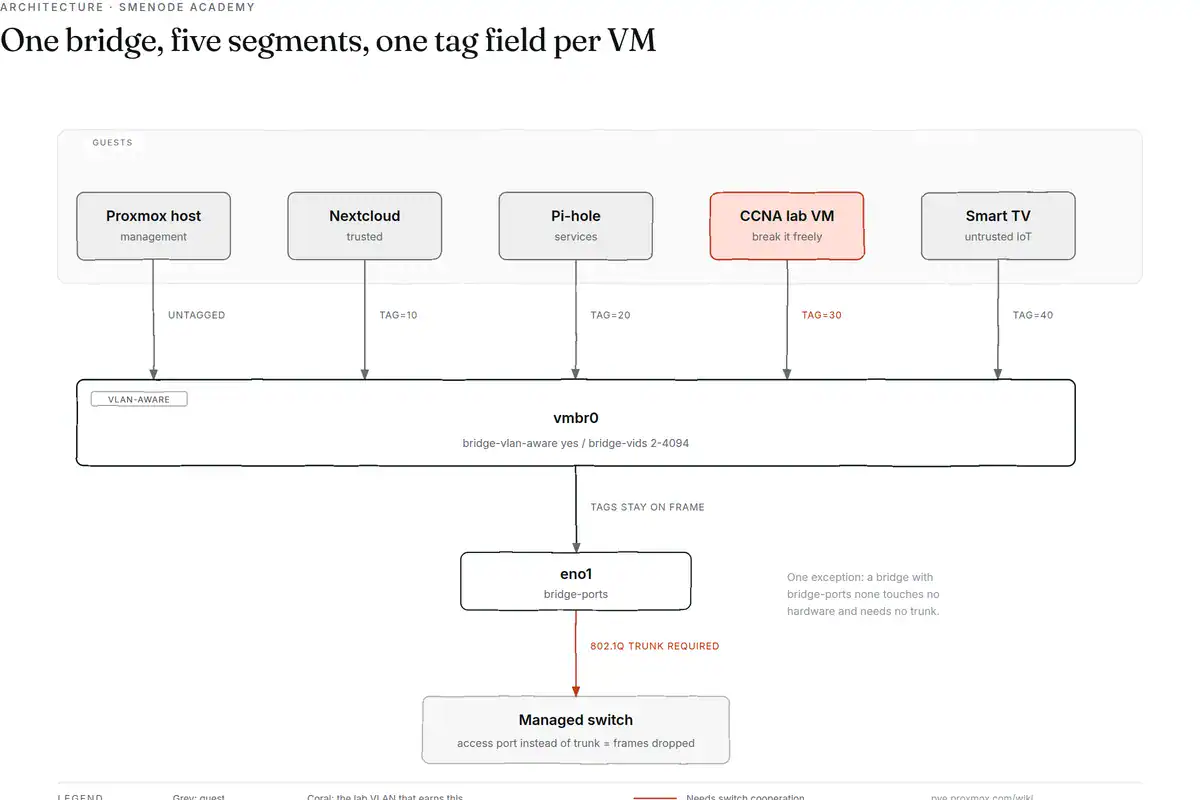
A VLAN-aware bridge handles tagging inside the bridge itself. You configure it once, then set a VLAN tag per VM and you’re done. No new interfaces, no new bridges, no host reboot to add VLAN 30 next month.
auto vmbr0
iface vmbr0 inet manual
        bridge-ports eno1
        bridge-stp off
        bridge-fd 0
        bridge-vlan-aware yes
        bridge-vids 2-4094
Two lines do the work. bridge-vlan-aware yes turns the feature on, and bridge-vids 2-4094 declares which VLAN IDs the bridge will accept.
Notice inet manual with no address. If the host itself needs an IP on a specific VLAN, you add a stacked interface for it:
auto vmbr0.5
iface vmbr0.5 inet static
        address  10.10.10.2/24
        gateway  10.10.10.1

auto vmbr0
iface vmbr0 inet manual
        bridge-ports eno1
        bridge-stp off
        bridge-fd 0
        bridge-vlan-aware yes
        bridge-vids 2-4094
Now the host lives on VLAN 5, and your VMs can sit on any VLAN in the 2-4094 range independently.
To put a VM on a VLAN, open the VM, go to Hardware → Network Device, and fill in the VLAN Tag field. That’s it. In the config file it looks like this:
net0: virtio,bridge=vmbr0,tag=100That VM is now on VLAN 100. The general form is net[X]: <model>,bridge=<bridge>[,tag=<vlan>], and you want virtio as the model for any modern Linux or Windows guest with drivers installed. e1000 is the fallback for old guests that don’t have VirtIO drivers.
Worth knowing: the VM has no idea any of this happened. The guest OS sees a plain untagged NIC and configures a normal IP. All the tagging happens in the bridge, below the VM. That’s why you don’t install VLAN tooling inside the guest, and why a VM can move between VLANs with one field change and a reboot.
A practical homelab layout looks something like this:
| VLAN | Purpose | What lives there |
|---|---|---|
| 1 (untagged) | Management | Proxmox host, your admin machine |
| 10 | Trusted | Nextcloud, Home Assistant |
| 20 | Services | Pi-hole, reverse proxy |
| 30 | Lab | Anything you’re about to break |
| 40 | IoT | Devices you don’t trust |
The lab VLAN is the one that earns this whole article. Build a router topology for CCNA study, run something you downloaded from a forum, test a config that might flood the network with broadcasts, and none of it can touch your Nextcloud instance or your work laptop.
Method 2: traditional VLAN interfaces
The older approach creates a separate VLAN interface and a separate bridge for every VLAN. It works, and you’ll see it in tutorials from the PVE 6 era:
iface eno1.5 inet manual

auto vmbr0v5
iface vmbr0v5 inet static
        address  10.10.10.2/24
        gateway  10.10.10.1
        bridge-ports eno1.5
        bridge-stp off
        bridge-fd 0
The eno1.5 interface strips VLAN 5 tags off the physical NIC, and vmbr0v5 is a bridge dedicated to that one VLAN. Add VLAN 20 and you write two more blocks. Add ten VLANs and your interfaces file is 60 lines of near-identical config.
So why does this method still exist? A few older setups and some specific bridge-level features behave differently, and the traditional style makes the per-VLAN separation very explicit. For a homelab in 2026, use the VLAN-aware bridge.
VLAN comparison at a glance
| VLAN-aware bridge | Traditional VLAN interfaces | |
|---|---|---|
| Bridges needed | One | One per VLAN |
| Adding a VLAN | Set a tag on the VM | Edit interfaces, add 2 blocks, reload |
| Config length | Short, stays short | Grows with every VLAN |
| Where tagging happens | Inside the bridge | On a dedicated VLAN interface |
| Host reboot to add a VLAN | No | No, but needs a reload |
| Best for | Almost everything | Legacy setups, very explicit separation |
Your switch has to cooperate
This is the part tutorials skip, and it’s why “Proxmox VLAN not working” is such a common search.
VLANs need a managed switch. The port your Proxmox host plugs into must be configured as a trunk (Cisco language) or tagged port (most other vendors) carrying the VLANs you want. Plug a VLAN-aware Proxmox host into an unmanaged switch and every tagged frame gets dropped or ignored.
We see this one in nearly every cohort. Someone spends an evening rechecking bridge-vids, rewriting the interfaces file, rebooting the host twice, and the config was correct the entire time. The switch port was an access port on VLAN 1.
Your router also needs a sub-interface or SVI per VLAN if those VLANs are going to reach the internet. No gateway on VLAN 100 means VMs on VLAN 100 talk to each other and stop there. That’s a legitimate design for an isolated lab, and a frustrating surprise if you expected internet access.
Quick diagnostic order when a tagged VM has no network:
- Does an untagged VM on the same bridge work? If no, the problem isn’t VLANs.
- Is the switch port trunked for that VLAN ID?
- Does the VLAN have a gateway on your router?
- Is
bridge-vidscovering the ID you used?
Nine times out of ten it’s step 2.
Bonds: two NICs, one logical link
A bond combines multiple physical NICs into one logical interface. You get redundancy if a cable or switch port dies, and depending on the mode, more aggregate throughput.
Proxmox supports seven bonding modes: round-robin, active-backup, XOR, broadcast, IEEE 802.3ad (LACP), adaptive transmit load balancing, and adaptive load balancing.
In practice you’ll use two of them, and the deciding factor is your switch:
| Your switch | Mode | What you get |
|---|---|---|
| Managed, supports LACP | 802.3ad | Redundancy plus aggregate throughput |
| Unmanaged or no LACP | active-backup | Redundancy only |
The other five exist for specific cases. Round-robin and broadcast tend to cause more problems than they solve on a typical network, and the adaptive modes are niche enough that if you need them you already know why.
LACP (802.3ad), the one you want with a managed switch
auto bond0
iface bond0 inet static
      bond-slaves eno1 eno2
      address  192.168.1.2/24
      bond-miimon 100
      bond-mode 802.3ad
      bond-xmit-hash-policy layer2+3
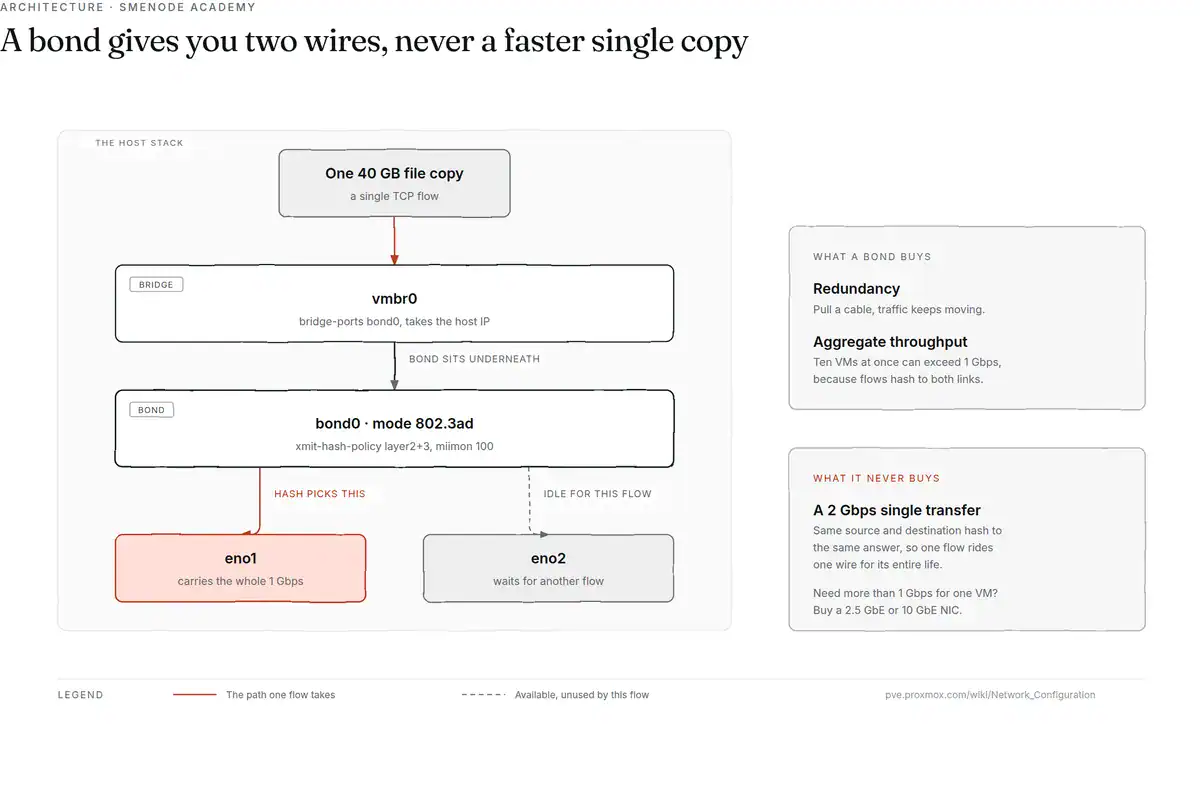
bond-slaves lists the physical NICs. bond-miimon 100 checks link state every 100 ms. bond-mode 802.3ad is LACP, and bond-xmit-hash-policy layer2+3 decides which physical link a given flow uses, hashing on MAC and IP together for a better spread than MAC alone.
LACP needs matching configuration on the switch side. Your switch must have those two ports in a link aggregation group, or the bond won’t come up cleanly.
Check whether it actually negotiated:
cat /proc/net/bonding/bond0You want to see 802.3ad as the bonding mode and both slaves showing MII Status: up. If a slave says down with the cable plugged in, the switch side isn’t configured, and a half-negotiated LACP bond behaves worse than no bond at all.
Now the expectation setting, because this one disappoints people. LACP does not give one VM a 2 Gbps transfer. A single TCP flow hashes to a single physical link, so one large file copy still tops out at 1 Gbps.
Here’s why that happens. The hash policy takes source and destination details, runs them through a function, and picks a link. Same source and destination means the same answer every time, so one flow rides one wire for its entire life. That’s deliberate: splitting a single TCP stream across two links would deliver packets out of order and wreck throughput.
So what does a 2x 1 GbE bond actually buy you?
- Redundancy. Pull a cable and traffic keeps moving. This is the real reason to bond.
- Aggregate throughput. Ten VMs pulling data at once can collectively exceed 1 Gbps, because different flows hash to different links.
- Not a faster single transfer. Ever.
If you need one VM to move data faster than 1 Gbps, buy a 2.5 GbE or 10 GbE NIC. Bonding won’t do it, and no hash policy changes that.
Bond plus bridge, the production pattern
Most real setups put the bond underneath the bridge. The bond handles physical redundancy, the bridge handles VM connectivity:
auto bond0
iface bond0 inet manual
      bond-slaves eno1 eno2
      bond-miimon 100
      bond-mode 802.3ad
      bond-xmit-hash-policy layer2+3

auto vmbr0
iface vmbr0 inet static
        address  10.10.10.2/24
        gateway  10.10.10.1
        bridge-ports bond0
        bridge-stp off
        bridge-fd 0
The bond is manual with no IP. The bridge takes the address and uses bridge-ports bond0 instead of a physical NIC.
Add bridge-vlan-aware yes and bridge-vids 2-4094 to that bridge and you’ve got VLANs riding a redundant bonded link. That’s genuinely how this is done in production, and it’s worth building once in a homelab so the pattern is familiar when you meet it at work.
No managed switch? Use active-backup
If your switch can’t do LACP, active-backup mode needs nothing from the switch at all. One NIC carries traffic, the second sits idle until the first fails. You get redundancy with zero throughput gain, and it works on a dumb switch.
Set bond-mode active-backup in place of the 802.3ad line and drop the hash policy. Proxmox’s official docs don’t publish a verbatim active-backup snippet, so build it in the GUI (Node → Network → Create → Linux Bond) and let Proxmox write the syntax rather than copying a block off a forum post.
The Proxmox firewall (and the flag everyone misses)
Proxmox has a built-in firewall with three levels, each with its own config file:
| Level | Config file | Scope |
|---|---|---|
| Datacenter | /etc/pve/firewall/cluster.fw | Cluster-wide rules |
| Host / node | /etc/pve/nodes/<nodename>/host.fw | That specific node |
| VM / container | /etc/pve/firewall/<VMID>.fw | One guest |
The service is pve-firewall, and pve-firewall status is worth knowing because it compiles every rule and surfaces config errors instead of failing silently. Full rule reference lives in the Proxmox firewall docs.
When you enable it, the default posture is deny: “traffic to all hosts will be blocked by default, with some exceptions.” Those exceptions are sensible ones that stop you locking yourself out, including TCP 8006 for the web GUI, TCP 22 for SSH, TCP 5900-5999 for VNC consoles, TCP 60000-60050 for migration, and UDP 5405-5412 for corosync (which matters in Part 4).
Here’s the trap. Each virtual network device has its own firewall enable flag, and it’s required in addition to the general firewall option.
Turn the firewall on at the datacentre level, write careful rules for a VM, and nothing happens because the checkbox on that VM’s NIC is off. Two flags, both required. This is the single most common Proxmox firewall complaint and it’s almost never a rule problem.
The flag lives on the network device, not the firewall tab, which is why people miss it. In the VM config it shows up as firewall=1 on the NIC line:
net0: virtio,bridge=vmbr0,tag=100,firewall=1If that firewall=1 isn’t there, your rules are decoration. Check it with qm config 100 | grep net0 before you spend an evening rewriting rules that were fine.
One more piece of advice from experience: turn the firewall on at the datacentre level last, not first. Write and test your VM-level rules while the global switch is still off, then enable it. Getting the order backwards is how people lock themselves out of the web UI on a remote host, and the fix requires console access.
One more note for the curious. Proxmox is migrating from iptables to nftables via a package called proxmox-firewall, which is still tech preview in PVE 9, not the default. A Proxmox staff member put it plainly in a June 2026 forum thread: there’s no general recommendation to switch yet, though the old pve-firewall is planned for deprecation eventually and some newer features may only work with nftables. For a homelab, stay on the default.
The NIC rename trap that breaks PVE 9 upgrades
This is the section to actually read. It’s the most common way people lose access to a Proxmox host, and it caught a lot of people upgrading from 8 to 9.
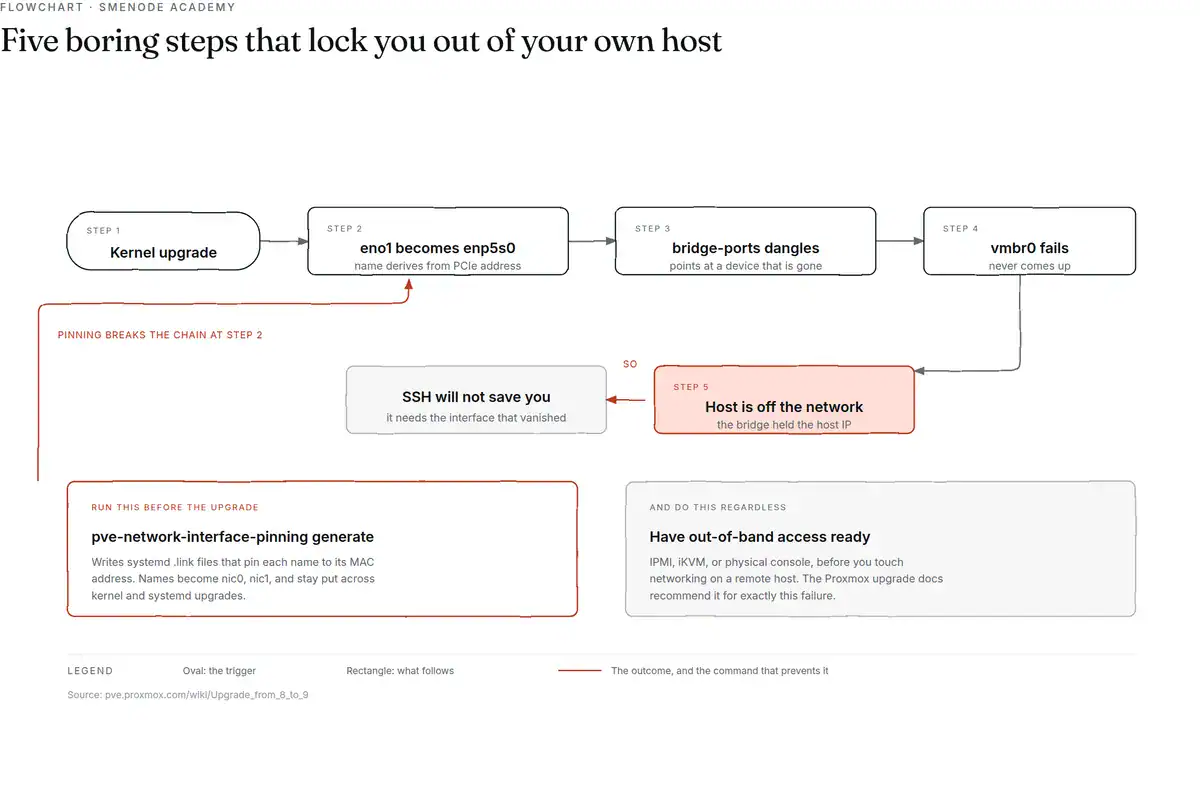
Linux names NICs predictably based on hardware position, giving you eno1 or enp3s0f1 instead of the old eth0. Stable, until the thing generating the name changes. Per the Proxmox 8 to 9 upgrade guide: “Due to the new kernel recognizing more features of some hardware, like for example virtual functions, and interface naming often derives from the PCI(e) address, some NICs may change their name.”
Follow the chain, because each step is boring and the outcome isn’t:
- Kernel upgrade renames
eno1toenp5s0. - Your
bridge-ports eno1line now points at a device that doesn’t exist. - The bridge fails to come up.
- The bridge holds the host IP.
- Your host is off the network, and the web UI is gone with it.
SSH won’t save you, because SSH needs the interface that just disappeared. If the machine is in a colo or a cupboard you can’t easily reach, that’s your evening gone.
PVE 9 ships a tool to prevent exactly this:
pve-network-interface-pinning generateIt writes systemd .link files that pin each NIC’s name to its MAC address, and updates your Proxmox config to match. Names become nic0, nic1, and so on, and they stay that way across kernel and systemd upgrades. You can be more targeted too:
pve-network-interface-pinning generate --interface enp1s0
pve-network-interface-pinning generate --interface enp1s0 --target-name if42
Run this before your next major upgrade. And regardless of pinning: have IPMI, iKVM, or physical console access available before you touch networking on a remote host. The Proxmox upgrade docs recommend out-of-band access for this exact reason.
What to do when a VM loses network
Three causes, in the order you should check them:
- Changes were staged but never applied.
/etc/network/interfaces.newexists and you never clicked Apply Configuration. Check for the file first, it costs five seconds. - The per-NIC firewall flag. Covered above. Datacentre firewall on, VM NIC flag mismatched.
- VLAN tag with no switch trunk. The VM is tagged for VLAN 20, the switch port isn’t carrying VLAN 20. Frames go nowhere.
On MTU, one specific thing is worth knowing. For VirtIO vNICs, leaving the MTU field empty or setting mtu=1 inherits the MTU from the underlying bridge, and PVE 9.0’s breaking-changes list included a changed default for that field. If you run jumbo frames, verify it.
Standard networking rules apply here rather than anything Proxmox-specific: every hop, the bond, the bridge, and the physical switch all need the same MTU, or you get the classic works-for-ping-fails-for-large-transfers behaviour.
What about Proxmox SDN?
Proxmox SDN (Software Defined Networking) manages virtual networks centrally across a cluster instead of editing /etc/network/interfaces on each node. It gives you five zone types, straight from the SDN documentation:
| Zone | What it does |
|---|---|
| Simple | Isolated bridge, a simple layer 3 routing bridge with NAT |
| VLAN | The classic method of subdividing a LAN |
| QinQ | Stacked VLAN, formally IEEE 802.1ad |
| VXLAN | Layer 2 VXLAN network over a UDP tunnel |
| EVPN | VXLAN with BGP for layer 3 routing |
Support status is split, and it’s worth being precise since plenty of blog posts get this wrong. Core SDN, meaning VNet management and its integration with the Proxmox stack, is fully supported and has been since PVE 8.0. But IPAM with DHCP management for guests is tech preview, and complex routing via FRRouting plus controller integration is also tech preview.
So “SDN is new in Proxmox 9” is wrong, and so is “SDN is fully GA”. Both claims circulate widely.
What’s actually new in PVE 9 is SDN Fabrics, added in 9.0 and extended in 9.2 with WireGuard and BGP as fabric protocols, route maps and prefix lists for BGP/EVPN filtering, OSPF route redistribution, and an IPv6 underlay for EVPN. Fabrics automatically configure routing protocols on your physical interfaces, which is how you’d build a spine-leaf underlay with multipath and NIC failover.
The practical difference from what you built earlier: SDN config lives in /etc/pve/sdn and replicates across the cluster, so you define a network once and every node gets it. Hand-edited /etc/network/interfaces files don’t replicate. On one node that costs you nothing. On five nodes it’s the difference between one change and five chances to typo.
Do you need any of this in a homelab? Honestly, no. One node with a VLAN-aware bridge covers everything in this article, and the tooling adds a layer of abstraction over the same Linux networking you’ve just learned to read.
Here’s a rough line for when it starts earning its keep:
| Setup | Use |
|---|---|
| One node, a few VLANs | VLAN-aware bridge. Skip SDN. |
| Two or three nodes, same VLANs everywhere | Either works. SDN saves repeated edits. |
| Several nodes, networks changing often | SDN, for the central definition |
| Overlay networks across subnets | SDN with VXLAN or EVPN |
Learn it because employers ask about it, not because your Pi-hole needs it. If you’re studying for infrastructure roles, knowing that EVPN is VXLAN plus BGP for layer 3 routing is worth more in an interview than having it running at home.
Proxmox networking FAQ
What’s the difference between a bridge and a VLAN in Proxmox?
A bridge is a virtual switch that forwards traffic between VMs and your physical network. A VLAN is a tag on Ethernet frames that keeps traffic logically separated even when it shares one physical link. They work together rather than competing: you build one bridge, make it VLAN-aware, then assign each VM a VLAN tag. The bridge moves the frames, the VLAN decides which frames are allowed to see each other.
Should I use a VLAN-aware bridge or traditional VLAN interfaces?
Use a VLAN-aware bridge for nearly every setup. You configure it once with bridge-vlan-aware yes and bridge-vids 2-4094, then assign VLANs per VM with a single tag field. Traditional VLAN interfaces need a separate interface plus a separate bridge per VLAN, so a five-VLAN setup means five times the config. The traditional method survives mainly in older installs and cases where you want very explicit per-VLAN separation.
Does LACP bonding double my network speed?
No, not for a single transfer. A single TCP flow hashes to one physical link, so one large file copy over a 2x 1 GbE LACP bond still runs at roughly 1 Gbps. What LACP actually buys you is redundancy when a cable or switch port fails, plus higher total throughput across many simultaneous flows, like ten VMs each pulling data at once. If you need one VM to move data faster than 1 Gbps, buy a 2.5 GbE or 10 GbE NIC instead of bonding.
Why did my Proxmox host lose network after an upgrade?
Almost always a renamed NIC. A new kernel or systemd version can change a predictable interface name like eno1 to something else, and your bridge-ports eno1 line then references a device that no longer exists, so the bridge holding your host IP never comes up. Fix it from console by editing /etc/network/interfaces to the new name, then run pve-network-interface-pinning generate to pin names to MAC addresses so it can’t happen again. Always arrange IPMI or physical console access before upgrading a remote host.
Do I need a managed switch for Proxmox VLANs?
Yes, for VLANs that leave the host. The switch port feeding your Proxmox host has to be a trunk or tagged port carrying the VLAN IDs you’re using, and your router needs a sub-interface per VLAN if those networks should reach the internet. An unmanaged switch drops or ignores tagged frames, so your Proxmox config can be perfect and nothing works. The one exception is a fully isolated bridge with bridge-ports none, which never touches physical hardware and needs no switch support at all.
Why is my Proxmox VLAN-aware bridge not working?
Check the switch before the config. The most common cause is a switch port set as an access port rather than a trunk carrying your VLAN IDs, which silently drops every tagged frame. Then verify bridge-vids actually covers the tag you assigned, confirm the VLAN has a gateway on your router if it needs internet, and check whether your changes are still sitting unapplied in /etc/network/interfaces.new. Test with an untagged VM on the same bridge first: if that fails too, the problem isn’t VLAN-related.
Is Proxmox SDN worth setting up in a homelab?
Rarely. A single node with one VLAN-aware bridge handles everything a home setup needs, and SDN adds a management layer whose payoff starts at three or more nodes where you’d otherwise hand-edit identical configs on every host. Core SDN is fully supported and has been since PVE 8.0, but IPAM/DHCP and FRRouting-based complex routing are still tech preview. Set it up to learn the concepts for work, not because your homelab requires it.
How do I apply network changes without rebooting Proxmox?
Run ifreload -a from the shell, or click Apply Configuration in the web UI. Both work through ifupdown2, which has been the default for new installs since PVE 7.0. Remember that GUI edits are staged in /etc/network/interfaces.new and change nothing until applied, which is the usual reason a config edit appears to have no effect. If ifreload isn’t found, install it with apt install ifupdown2, which is occasionally needed on hosts built on plain Debian or upgraded from much older versions.
Wrap up: your network is now segmented
You read the interfaces file and understood what the installer built, converted vmbr0 into a VLAN-aware bridge, put VMs on separate VLANs with one tag field, bonded two NICs for redundancy, enabled the firewall at all three levels, and pinned your NIC names so the next kernel upgrade can’t lock you out.
That’s a real network design, not a lab exercise. The bridge-VLAN-bond stack you just configured is the same pattern running under production hypervisors, and the failure modes you now recognise (staged configs, per-NIC firewall flags, renamed interfaces, missing switch trunks) are the ones that generate support tickets in actual data centres.
Coming next in this series:
- Part 3: Backups. Backup modes, retention that doesn’t quietly eat your disk, and Proxmox Backup Server with deduplication. Because a homelab with no backup is a homelab you rebuild from scratch.
- Part 4: Clustering. Multiple nodes, quorum, live migration, and high availability.
In the meantime, pick one VLAN and actually move a VM onto it. Reading about tagging teaches you nothing compared to watching a VM lose connectivity because the switch port wasn’t trunked, then fixing it yourself.
If you’d rather work through it with an instructor reviewing your config before you break something, our live Proxmox VE course runs in small cohorts with lab time and a group where the instructor actually answers. For the container side of the story, our Proxmox vs Docker comparison covers where LXC and Docker networking differ.
Questions about a config that won’t come up? Drop them in the comments.