
A proxmox homelab turns one old computer into a private virtualization lab you can learn on, break, and rebuild whenever you want. You install Proxmox VE on bare-metal hardware, open a web browser, and create your first virtual machine from a graphical wizard. That’s the whole workflow, and the total build time usually runs 2 to 3 hours for a first-time homelabber.
This guide walks you through every step for Proxmox VE 9.1, which was built on Debian 13 “Trixie” and released in 2026 with the latest Linux kernel and QEMU updates. By the end, you’ll have a fully updated Proxmox host plus a live Ubuntu 24.04 LTS virtual machine running on it, with no guessing or skipped steps along the way.
Here’s the short version of the entire workflow in five sequential steps:
- Pick hardware that meets the minimum virtualization requirements (any 64-bit CPU with Intel VT-x or AMD-V support, 8 GB of RAM, and one SSD).
- Download the Proxmox VE installation ISO and write it to a USB drive using Rufus, balenaEtcher, or the
ddcommand. - Boot the target machine from the USB stick, run through the graphical installer, and configure a static IP address.
- Open
https://your-ip:8006in a browser, dismiss the subscription popup, and fix the apt package repository configuration. - Upload an Ubuntu ISO to local storage, click Create VM in the top right corner, and boot your first virtual machine.
This is the same end-to-end path we cover in our Proxmox VE training programme, along with live instructor time and EVE-NG labs for students who want guided practice. If you want to learn it on your own first before paying for structured instruction, you’re in the right spot, so let’s walk through every step together.
Why build a proxmox homelab at all?
A homelab is a private computer lab you run at home for learning, testing, and self-hosting services you’d normally rent from a cloud provider. Homelab proxmox setups use Proxmox VE as the hypervisor because it’s the free, open-source way to run virtual machines and Linux containers side by side on one box.
Why not just run VirtualBox or VMware Workstation instead? Those products run on top of your existing operating system, which means Windows or macOS is always sitting underneath eating RAM and CPU cycles. Proxmox is a Type-1 hypervisor, so it installs directly on bare metal and talks straight to the hardware for better performance, real clustering options, and a web UI you can reach from any device on your network. For a full breakdown of how it stacks up against VMware’s enterprise stack, read our Proxmox vs VMware comparison.
Searches for proxmox for homelab are up 750% year over year, and the reason is simple: Broadcom bought VMware, killed the free ESXi tier, and raised VMware subscription costs across the board. Homelabbers moved to Proxmox almost overnight.
What a Proxmox homelab teaches you
A well-built Proxmox homelab naturally teaches you several important infrastructure skills through daily usage:
- Linux fundamentals including the Debian base, command-line tools, and the networking stack configuration
- Virtualization concepts including virtual machines, Linux containers, software bridges, and storage pools
- Backup and snapshot workflows for both ad-hoc recovery and scheduled protection policies
- Network segmentation techniques using VLANs and Linux bridges across multiple subnets
- High-availability clustering fundamentals once you add a second physical node to the setup
These skills map directly to real IT job titles like junior sysadmin, cloud engineer, DevOps engineer, and network automation engineer. Our DevOps trends 2026 guide breaks down exactly which of these skills employers across Canada and the US are currently hiring for at scale.
A quick note on versions before you start. Proxmox VE 9.0 shipped in August 2025 with Debian 13 “Trixie,” Linux kernel 6.14.8, QEMU 10.0, LXC 6.0, and ZFS 2.3 , and VE 9.1 is the current point release as of April 2026. If you follow an older tutorial built for VE 7 or VE 8 some of the menus and screens will look different, so use this guide instead to match what’s on screen.
Hardware requirements for a proxmox homelab
Good news first: Proxmox will boot on almost anything 64-bit from the last 10 years, and the official minimum spec is genuinely small. The catch is that “will boot” and “will actually run something useful” are two different things, so read through the recommended specs below before you grab that dusty tower out of the closet.
Proxmox VE official minimum

Per the Proxmox system requirements wiki, the bare minimum is:
- CPU: 64-bit x86 with Intel VT-x or AMD-V enabled
- RAM: 2 GB
- Storage: 32 GB boot disk
- Network: one Gigabit Ethernet port
That’s enough to install the OS and log into the web UI. It isn’t enough to run real workloads.
Recommended specs for a real homelab
| Component | Bare minimum | Recommended | Ideal |
|---|---|---|---|
| CPU | 2 cores, 64-bit | 4-6 cores, i5 or Ryzen 5 | 8+ cores, Xeon or EPYC |
| RAM | 2 GB | 16 GB | 32-64 GB |
| Storage (boot) | 32 GB | 256 GB SSD | 500 GB NVMe |
| Storage (VMs) | shared with boot | 512 GB SSD | 1 TB+ NVMe, PLP |
| Network | 1x 1 GbE | 2x 1 GbE | 2.5 GbE or 10 GbE |
For most homelabs, 16 GB of RAM and a 256 GB SSD is the sweet spot . That’s enough to run 3 to 5 VMs at once plus a handful of LXC containers.
Three hardware paths to pick from
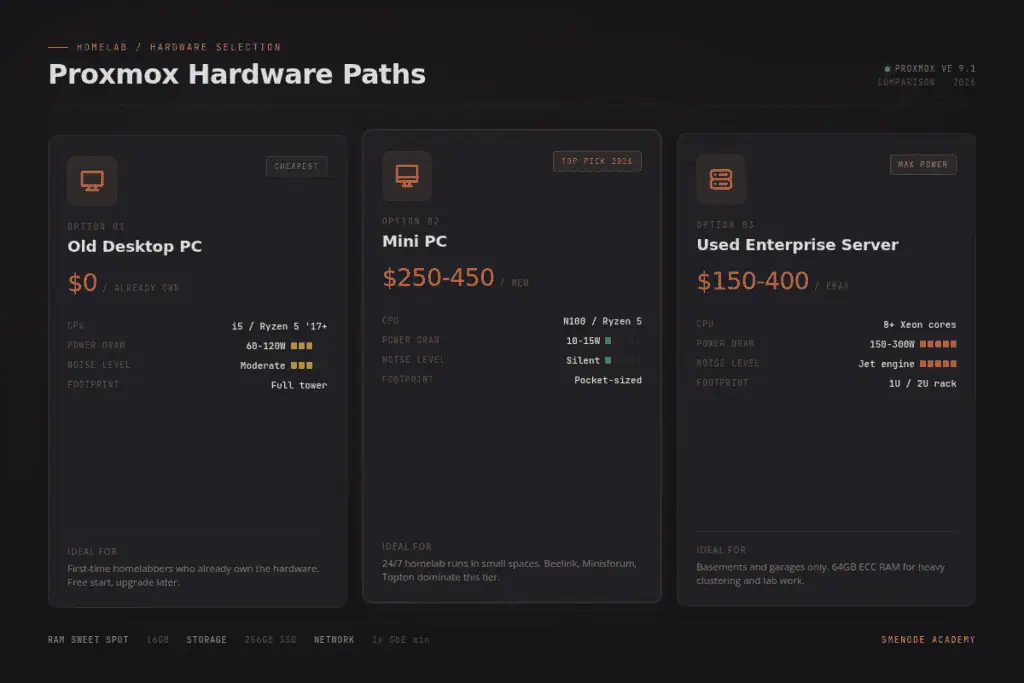
You have three main options. Pick the one that fits your budget and space.
Option 1: Old desktop PC. This is the cheapest path because any i5 or Ryzen 5 from 2017 or later works, and you probably already own one sitting in a closet. The downsides are that desktops are bigger, louder, and draw more power than the alternatives.
Option 2: Mini PC. Mini PCs are the most popular 2026 homelab choice because Beelink, Minisforum, and Topton all sell N100 or Ryzen 5 models for $250 to $450. They’re small, silent, and draw only 10 to 15 watts at idle, which makes them perfect for 24/7 homelab use.
Option 3: Used enterprise server. A Dell R630, HP DL360, or Lenovo RD650 off eBay runs $150 to $400 and usually comes with 64 GB of ECC RAM and 8+ cores. The tradeoff is massive noise plus $25 to $50 per month in electricity, so this path only makes sense if you have a basement or garage to put it in.
The SSD question (don’t skip this)
Proxmox docs are blunt about consumer SSDs: they wear out fast because of how QEMU writes VM data to disk, and the official recommendation is an enterprise SSD with Power Loss Protection (PLP).
For a homelab that doesn’t run 24/7, a decent consumer SSD is still fine in practice. Avoid DRAM-less QLC drives like the Samsung 870 QVO or the WD Green SN350 because their write performance collapses under VM workloads, and pick a TLC drive with a DRAM cache instead. The Samsung 870 EVO, WD Red SA500, and SK Hynix Gold P31 all work well for multi-VM homelab use.
Before you install: BIOS checks
Before you write the USB stick, reboot into your BIOS and check three things that trip up most first-time Proxmox installs:
- Virtualization is on. Look for an option called “Intel VT-x,” “AMD-V,” or “SVM” and turn it on if it isn’t already.
- Secure Boot is off. Proxmox ships unsigned kernels, so Secure Boot will refuse to load them on boot.
- Boot order. Put USB above the internal drive in the boot priority list, or be ready to hit the boot menu key (usually F12 on Dell and Lenovo systems).
Skip these and the installer either won’t see virtualization support or, worse, won’t boot from the USB at all.
Step 1: Download and flash the Proxmox VE ISO
Head to proxmox.com/downloads and grab the latest Proxmox VE ISO, which is Proxmox VE 9.1 as of April 2026. The file is around 1.4 GB, and you should always verify the SHA256 checksum against the value on the download page before flashing.
You also need an 8 GB or larger USB stick, and everything on it will be erased during the flash, so pick one you don’t care about losing.
Flash the ISO on Windows (Rufus)
- Download Rufus. It’s free and portable.
- Open Rufus. Pick your USB device in the top dropdown.
- Click SELECT and choose the Proxmox ISO.
- Leave partition scheme on GPT, target system on UEFI.
- Click START. If Rufus asks “ISO or DD mode,” pick DD mode. This matters. ISO mode won’t boot Proxmox correctly.
- Wait 5 to 10 minutes.
Flash the ISO on Linux or macOS (dd command)
# Find your USB device first
diskutil list  # macOS
lsblk          # Linux

# Replace /dev/sdX with your actual device
sudo dd if=proxmox-ve_9.1-1.iso of=/dev/sdX bs=4M status=progress conv=fsync
sudo sync
Warning: dd will silently wipe any drive you point it at. Double-check the target device before pressing Enter. Getting this wrong will erase your main drive.
Flash the ISO with balenaEtcher (safest)
If dd scares you, use balenaEtcher. Open it, pick the ISO, pick the USB, click Flash. Done. It’s slower than dd but much safer.
Once the USB is ready, unplug it from your daily computer and plug it into the machine you want to turn into a Proxmox host.
Step 2: Install Proxmox VE on bare metal
Power on the target machine with the Proxmox USB plugged in, then hit your boot menu key (F12, F11, or Esc depending on vendor) and pick the USB stick from the list. Within a few seconds you should see the graphical Proxmox installer menu.
Pick Install Proxmox VE (Graphical) and press Enter to start the installer. If the graphical installer hangs on your specific hardware (this happens on some older Intel GPUs), reboot and pick Install Proxmox VE (Terminal UI) instead for the same installation outcome with a text-based look.
Walk through the installer
The Proxmox installer asks for seven things. Here’s what to pick for a homelab.
1. End User License Agreement. Click “I agree.” Proxmox VE is GPL v2. Free to use forever.
2. Target Hard Disk. Pick your SSD. If you have more than one drive, the installer lists them all. Click “Options” to change the filesystem. For a single-disk homelab, leave it on ext4. ZFS is nicer but eats more RAM (1 GB per TB of storage, minimum 8 GB overall). Pick ext4 for now. You can rebuild with ZFS later.
3. Location and time zone. Pick your country, time zone, and keyboard layout. Canada, America/Toronto, and English (US) work for most of us.
4. Administrator password. Set a strong root password. Write it down. You can’t recover it. Add a real email address. Proxmox uses it for alerts and certificate notifications.
5. Network configuration. This is the part people mess up. Pick your main network card from the dropdown. Set:
- Hostname (FQDN):
pve.homelab.local(or whatever you like) - IP address (CIDR):
192.168.1.100/24(pick one outside your DHCP range) - Gateway: your router’s IP, usually
192.168.1.1 - DNS server:
1.1.1.1or your router
Static IPs matter. You’ll reach Proxmox through this IP every time. DHCP works but gives you a moving target.
6. Summary screen. Check everything. Tick “Automatically reboot after successful installation” and click Install.
7. Wait and reboot. Install takes 3 to 5 minutes on an SSD. When it’s done, yank the USB stick and let the machine reboot.
First boot
You’ll see a login prompt on the Proxmox console, but don’t touch it because Proxmox is designed to be managed remotely through the web UI. Walk over to another computer on the same network, open a browser, and go to:
https://192.168.1.100:8006Replace 192.168.1.100 with whatever IP you set in the installer, and your browser will immediately throw a warning about the self-signed certificate. Click Advanced and proceed anyway, because this is normal behaviour on a fresh Proxmox install until you replace the default cert with a real one from Let’s Encrypt.
Log in with username root and the password you set during installation, and keep the authentication dropdown on Linux PAM standard authentication because that’s the default for local accounts. You’re in.
Step 3: Fix the package repository and update
The first thing you’ll see after login is a popup warning that reads “You do not have a valid subscription for this server,” and it will show up every time you open the web UI until you fix the package repository. Don’t panic, because you don’t need a paid subscription for a homelab install, and the fix is to point Proxmox at the free community repository instead of the paid enterprise one.
Here’s the full fix, broken down step by step so you can copy each command.
Disable the enterprise repositories
SSH into the Proxmox host from another computer, or click the host name in the left sidebar, open the Shell tab at the top, and run the commands below.
# Disable the PVE enterprise repo
sed -i 's/^deb/#deb/' /etc/apt/sources.list.d/pve-enterprise.list

# Disable the Ceph enterprise repo (even if you don't use Ceph)
sed -i 's/^deb/#deb/' /etc/apt/sources.list.d/ceph.list
Those commands comment out the paid repositories. apt update won’t try to hit them anymore.
Add the free no-subscription repository
# Add the no-subscription repo for PVE 9 (Debian 13 Trixie base)
echo "deb http://download.proxmox.com/debian/pve trixie pve-no-subscription" > /etc/apt/sources.list.d/pve-no-subscription.list
Update everything
apt update
apt dist-upgrade -y
This pulls the latest kernel, QEMU, and patch updates. It takes 2 to 5 minutes. Reboot if it prompts you.
rebootLog back in at https://your-ip:8006 when it comes back.
Why the no-subscription repo matters
The enterprise repo only works with a paid Proxmox subscription key, and without one, apt update will throw a 401 error so your host can never pull security patches or kernel updates. That’s a bad spot to be in for any machine connected to a network, because unpatched hypervisors are one of the top targets for opportunistic attackers. The no-subscription repo gets the same packages a few days later without the enterprise tier support contract, which is perfect for homelab use because you get full security coverage at zero cost.
You’re now running a fully updated, fully patched Proxmox VE 9.1 host on free software, so it’s time to make it do something useful by creating your first virtual machine.
Step 4: Create your first virtual machine
The whole point of proxmox homelab setup is running VMs, so let’s spin one up and watch it boot. We’ll install Ubuntu 24.04 LTS because it’s free, stable, and officially supported by Canonical through 2029 with standard security patches.
Upload an Ubuntu ISO
- Download the Ubuntu 24.04 LTS server ISO from ubuntu.com/download/server. It’s around 3 GB.
- In the Proxmox web UI left sidebar, click local (pve) under your node.
- Click the ISO Images tab.
- Click Upload, pick the ISO file, click Upload again.
- Wait for the upload to finish. Bigger ISOs take a minute or two.
Click “Create VM”
Look for the blue Create VM button in the top right corner of the Proxmox UI and click it to launch the VM creation wizard. You’ll see a wizard with seven tabs running across the top, and here’s what to set in each one for a working Ubuntu test VM.
Tab 1: General
- VM ID: 100 (Proxmox auto-fills the next free ID)
- Name:
ubuntu-test - Resource Pool: leave blank
Tab 2: OS
- ISO Image: pick the Ubuntu ISO you uploaded
- Type: Linux
- Version: 6.x – 2.6 Kernel
Tab 3: System
- Graphic card: Default
- Machine:
q35(modern Linux VMs work better with q35 than i440fx) - BIOS: OVMF (UEFI) if you want secure boot, SeaBIOS otherwise. Pick SeaBIOS for your first VM. It just works.
- Qemu Agent: tick the box
Tab 4: Disks
- Bus/Device: VirtIO Block (fastest option)
- Storage:
local-lvm - Disk size (GiB): 20 (plenty for Ubuntu)
- Cache: Default (No cache)
- Discard: tick if you’re on SSD (this enables TRIM)
Tab 5: CPU
- Sockets: 1
- Cores: 2
- Type:
host(gives the VM access to all your CPU features)
Tab 6: Memory
- Memory (MiB): 4096 (that’s 4 GB)
- Ballooning: leave on
Tab 7: Network
- Bridge:
vmbr0(Proxmox’s default bridge) - Model: VirtIO (paravirtualized)
- VLAN Tag: blank for now
Tab 8: Confirm. Check the summary. Tick Start after created. Click Finish.
Install Ubuntu inside the VM
Proxmox creates the VM and automatically starts it, so click the new VM in the left sidebar and then click Console at the top to open the live display. You’re now looking at the Ubuntu installer running inside the VM through a web-based VNC session, which means you can interact with it from any browser on any device.
Run through the Ubuntu installer like you would on any physical machine:
- Pick English. Pick your keyboard layout.
- Accept the default installer options (no cloud-init for your first test).
- Let it auto-partition the 20 GB disk.
- Set a username and password.
- Tick “Install OpenSSH server.”
- Wait 5 to 8 minutes for the install to finish.
- Reboot when it prompts.
When Ubuntu boots, log in at the console and run ip a to confirm the VM pulled a DHCP address from your home router. SSH into it from another machine on the same network to confirm the end-to-end network path works properly.
That’s it, you now have a working virtual machine running on Proxmox. Everything past this point is a variation on the same four-step theme: upload another ISO, click Create VM, pick your specs, and install the guest OS.
Post-install checklist (do these before you break things)
Your Proxmox host is running and your first VM is running, which feels like a great spot to start piling on more workloads. Before you do that, though, take 15 minutes to lock down the boring stuff below, because these six quick tasks will save you days of debugging later when something inevitably goes sideways.
1. Turn on automatic security updates on the host.
apt install unattended-upgrades
dpkg-reconfigure --priority=low unattended-upgrades
Pick “Yes” when it asks about unattended upgrades, and Proxmox will then pull security patches for the Debian base operating system every single night without you having to think about it.
2. Enable SMART disk monitoring.
apt install smartmontools
systemctl enable --now smartd
Run smartctl -a /dev/sda to check drive health any time you want a status report. This setup lets you catch dying SSDs before they take your VMs down with them.
3. Create your first backup job. In the web UI, click Datacenter → Backup → Add, then pick your VM, a storage target (local is fine for now), a schedule (daily at 3 a.m. is a typical choice), and a compression algorithm (zstd is the fastest on modern CPUs). Save the job and run it once manually to confirm it works end to end. Proxmox uses the built-in vzdump tool under the hood, so there’s no extra software to install and no licence fees to pay.
4. Take your first snapshot. Click the VM, click Snapshots, and click Take Snapshot with a name like clean-install so you remember what the state was. You can now roll back the VM any time you break it while running experiments.
5. Document your setup. Write down the host IP, root password, VM IDs, and network ranges in a password manager, because you will absolutely forget these details within a week if you don’t.
6. Turn off SSH password auth (optional but smart). Once you’ve set up SSH keys on the host, edit /etc/ssh/sshd_config and set PasswordAuthentication no, then reload SSH with systemctl reload sshd. Only key-based login will work from that point forward, so brute force attacks from the open internet stop working overnight.
Best proxmox homelab projects to build next
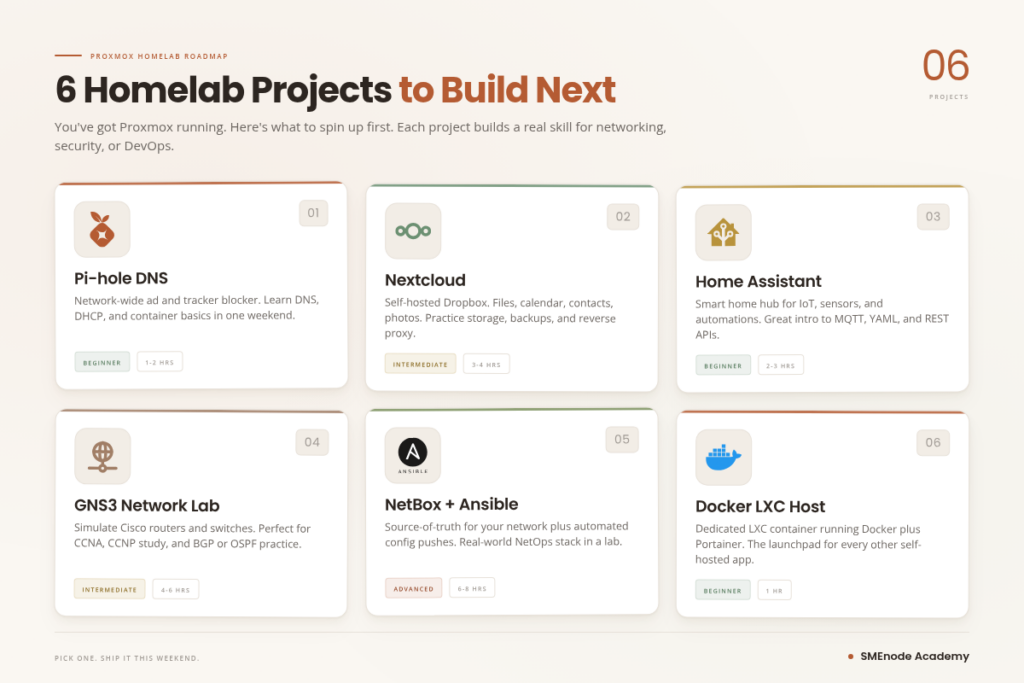
A single Ubuntu VM is just a warm-up, because the real fun starts when you pile services on top and see what your new hypervisor can handle. Here are six popular proxmox homelab projects you can build right now, ordered from easiest to most involved so you can pick based on how much time you have.
1. Pi-hole (network-wide ad blocker)
Run Pi-hole inside an LXC container and then point your router’s DNS at its IP address to block ads, trackers, and telemetry on every device at home. The whole deployment takes about 10 minutes, and it only needs 1 CPU core plus 256 MB of RAM to run smoothly for a household of 10 or more devices.
2. Nextcloud (self-hosted Google Drive)
Replace Google Drive, Dropbox, or OneDrive with something you actually own by running Nextcloud in a VM with 2 GB of RAM and a 100 GB disk. It syncs files, photos, calendars, and contacts across all your devices while keeping every byte on your own hardware instead of a US-based cloud provider.
3. Home Assistant (smart home hub)
Run Home Assistant OS as a dedicated Proxmox VM to control smart bulbs, thermostats, cameras, and sensors without relying on cloud accounts that can vanish overnight. Home Assistant works with thousands of devices out of the box, and you can add Zigbee or Z-Wave support by plugging in a USB dongle and passing it through to the VM with a single setting.
4. Full network lab for CCNA study
Run GNS3 or EVE-NG inside a Proxmox VM so you can nest real Cisco IOS images, build multi-router topologies, and practice labs for the Cisco exam on hardware you already own. If you’re studying for Cisco certifications, check our CCNA exam cost 2026 breakdown for current pricing and voucher options.
5. NetBox plus Ansible automation lab
Build a real network source of truth by installing NetBox in one LXC container and Ansible in another, then practice production-grade network automation workflows that map directly to paid roles. Our NetBox Ansible dynamic inventory guide walks through exactly what to build, and it’s the same workflow production network engineers use at big Canadian carriers.
6. Docker host for self-hosted apps
Run a Debian VM with Docker inside it and layer Portainer on top to manage containers visually, which lets you run Plex, Jellyfin, Immich, Gitea, or Uptime Kuma from one clean dashboard. For the deep dive on when to run apps inside LXC versus Docker, read our Proxmox vs Docker comparison that breaks down the performance tradeoffs.
Each of these projects is a real skill hiring managers in infrastructure roles will ask about, so they double as resume builders. Our IT certification jobs in Canada 2026 report shows which roles currently pay the most for hands-on infrastructure experience.
Proxmox homelab FAQ
Is Proxmox overkill for a homelab?
No, Proxmox is not overkill for a homelab because it’s free, runs on almost any x86 hardware, and the web UI is easier than ESXi for most beginners to learn. The only “overkill” part is worrying about features you don’t need yet like clustering, Ceph, and high availability, so just start with one node and one VM and add complexity when you have a real reason to need it.
How much RAM do I need for a Proxmox homelab?
8 GB of RAM is the practical floor for a real homelab, but 16 GB is the sweet spot for running 3 to 5 VMs at once alongside a handful of LXC containers. 32 GB lets you stop worrying about memory entirely for most home projects. Proxmox itself uses around 1 GB of the host memory, and everything else goes to your VMs, so if you pick ZFS as the filesystem you should add at least 8 GB extra for the ZFS ARC cache on top of that baseline.
Can I install Proxmox on a Raspberry Pi or a Mac mini?
Intel Mac mini yes, Raspberry Pi no, because Proxmox needs a 64-bit x86 CPU with virtualization support rather than ARM. Intel Mac minis from 2018 and later run Proxmox fine, while Apple Silicon models (M1, M2, M3, M4) are ARM-based and not officially supported by the Proxmox team. Raspberry Pi is ARM only, so Proxmox won’t install on any Pi model, and for ARM-based virtualization you should look at Incus or Proxmox’s LXC-only mode on Debian instead.
What’s the difference between a VM and an LXC container in Proxmox?
A VM is a full operating system with its own kernel running on virtual hardware, while an LXC container shares the host kernel and runs only the userspace of the guest OS. VMs are slower and more resource-hungry but they’re also more isolated and can run Windows, BSD, or any Linux distribution you want. LXC containers are much faster and use less RAM, but they only run Linux guests. For a full breakdown that includes Docker in the mix, read our Proxmox vs Docker comparison, because LXC and Docker are both container technologies but they solve very different problems.
How is Proxmox VE 9 different from Proxmox VE 8?
Proxmox VE 9.0 (released August 2025) rebased the whole platform on Debian 13 “Trixie” with Linux kernel 6.14.8, QEMU 10.0, LXC 6.0, and ZFS 2.3 at the core. The installer UI is cleaner, SDN fabric support was added for multi-node setups, and new HA affinity rules give you finer control over which cluster nodes can run which workloads. For a single-node homelab the practical differences are small, but for multi-node clusters VE 9 is absolutely worth the upgrade.
Should I use the enterprise or no-subscription repository?
Always pick no-subscription unless you buy a paid Proxmox support contract, because the enterprise repo only works with a valid subscription key and will otherwise throw a 401 error. Without enterprise access your host can’t update itself, which is dangerous for any production-adjacent machine. The no-subscription repo gets the same packages a few days later at zero cost, so homelabs should always run it. Step 3 above has the exact commands you need.
Is it legal to run Proxmox at home for free?
Yes, running Proxmox at home is completely legal because Proxmox VE is licensed under the GNU GPL v2 open-source licence. You can run it on as many machines as you want, forever, at no cost. Paid Proxmox subscriptions only buy you enterprise support and access to the vetted enterprise repository, and nothing else, because the core product is 100% open source under GPL.
Wrap up: your first proxmox homelab is live
You installed Proxmox VE 9.1 on bare metal, fixed the package repository, uploaded an Ubuntu ISO, built a VM from the wizard, and booted it through the web console. That’s the whole “bare metal to first VM” journey completed in a single afternoon of work.
What you’ve built isn’t a toy, because it’s the same virtualization platform companies run in production data centres right now. It uses the same web UI, the same command-line tools, and the same backup tooling that Proxmox certified admins use on the job, so every hour you spend on it is a direct investment in real infrastructure skills that employers pay for.
Here’s what to do next:
- Pick one project from the list above and build it this weekend
- Join the Proxmox subreddit for tips and troubleshooting
- Take a structured course if you want to go faster: our live Proxmox VE course runs in small cohorts with real instructor time and EVE-NG labs
- Keep breaking things. A homelab exists so you can fix it. That’s the whole point.
Questions about any step? Drop them in the comments. We read every one.