Most homelabs have backup jobs. Far fewer have backup jobs anyone has ever restored from, and the difference only becomes visible on the worst possible day.
Proxmox backs up VMs with a built-in tool called vzdump, and you get three modes: snapshot for almost no downtime, stop for maximum consistency, and suspend, which you should never pick. Add Proxmox Backup Server on top and you get deduplication, incremental uploads, and single-file restore. Both are free.
This is Part 3 of our Proxmox homelab series. Part 1 got Proxmox installed and your first VM running, and Part 2 segmented your network with VLANs and bonds. Now you’ve got infrastructure worth losing.
Here’s what you’ll set up:
- Pick the right backup mode for your storage and understand why
suspendis a trap. - Learn why a snapshot is not a backup, because this one costs people their data.
- Install the QEMU guest agent so your snapshots are filesystem-consistent, not just crash-consistent.
- Schedule a job with retention that keeps what you need and prunes the rest.
- Stand up Proxmox Backup Server for deduplication and incremental backups.
- Actually test a restore.
Version note. Proxmox VE 9.2 is current as of August 2026 (released 2026-05-21), and Proxmox Backup Server 4.2 shipped 2026-04-29 on Debian Trixie 13.4 (PVE roadmap, PBS roadmap). Part 1 was written against 9.1, so if you followed it you’re one release behind. Nothing below changes between them.
We teach this workflow with live instructor time in our Proxmox VE training programme. Let’s get your data protected.
The three backup modes, and which to use

Every Proxmox backup runs through vzdump. Your only real decision is the mode, and it’s the decision people get wrong.
| Mode | Downtime | Consistency | Use it? |
|---|---|---|---|
| snapshot | Near zero | Small inconsistency risk, fixed by the guest agent | Yes, default choice |
| stop | Short, full shutdown | Highest | For databases without agent hooks |
| suspend | Longer than snapshot | No better than snapshot | No |
Straight from the Proxmox backup docs, snapshot mode “provides the lowest operation downtime, at the cost of a small inconsistency risk” by copying data blocks while the VM runs. Stop mode “provides the highest consistency of the backup, at the cost of a short downtime” via an orderly shutdown, then backs up with a background QEMU process and restarts the VM.
Then there’s suspend. The docs are unusually blunt: it’s “provided for compatibility reason, and suspends the VM before calling the snapshot mode.”
Read that again. It suspends your VM and then runs snapshot mode anyway. You pay downtime and get nothing, which the docs confirm by noting it “does not necessarily improve the data consistency.” It exists for backwards compatibility. Skip it.
So when would you actually reach for stop mode? Two cases.
The first is a database with no freeze hooks configured. A snapshot catches it mid-transaction, and while PostgreSQL and MySQL both recover from that most of the time, “most of the time” isn’t a backup strategy for data you care about. Shut it down cleanly, back it up, start it again.
The second is a VM whose storage doesn’t support snapshots at all, which is the next section.
Everything else gets snapshot mode. A Pi-hole, a Nextcloud instance, a Docker host, a lab VM: none of those need downtime for a nightly backup, and taking it anyway means you’ll eventually stop running backups because they’re disruptive.
Snapshot mode needs the right storage
One catch. Snapshot mode “requires that all backed up volumes are on a storage that supports snapshots.”
In practice that means ZFS, LVM-thin, Ceph/RBD, or qcow2 on file-based storage. Plain LVM and raw images on a directory don’t qualify. If you followed Part 1 with the default LVM-thin setup, you’re fine.
To exclude a specific volume from backups, set the backup=no mount point option on it.
Containers work differently
The mode names are the same for LXC containers but the mechanics aren’t:
- stop stops the container for the duration
- suspend uses rsync in two passes, copying data, suspending, then copying changed files
- snapshot suspends the container, snapshots the volumes, and archives to tar
Two container gotchas worth burning into memory. Only the root disk is backed up by default, so extra mount point volumes need the Backup option explicitly ticked. And device and bind mounts are never backed up, full stop.
That second one is a genuine data-loss surprise. Bind-mount a media library or a photo archive into a container, assume the nightly job covers it, and it never did. The container config comes back fine and the data isn’t there.
Check what’s actually covered before you rely on it:
pct config 101Look at every mp0, mp1, and so on. A mount point with backup=1 is in. Without it, that volume is skipped.
The docs explain why bind mounts can never be covered: the backup flag is “only used for volume mount points.” A bind mount points at a host directory rather than a managed volume, so there’s nothing for the flag to apply to. Setting it changes nothing.
The fix depends on the mount type. For a regular mount point volume, tick Backup on it and you’re done. For a bind mount, the data lives on the host, so it needs its own protection: either back up the host path separately, or move the data into a proper mount point volume that vzdump will pick up.
This is worth ten minutes on every container you run. The failure is silent, and you find out during a restore.
Backup vs snapshot: they are not the same thing
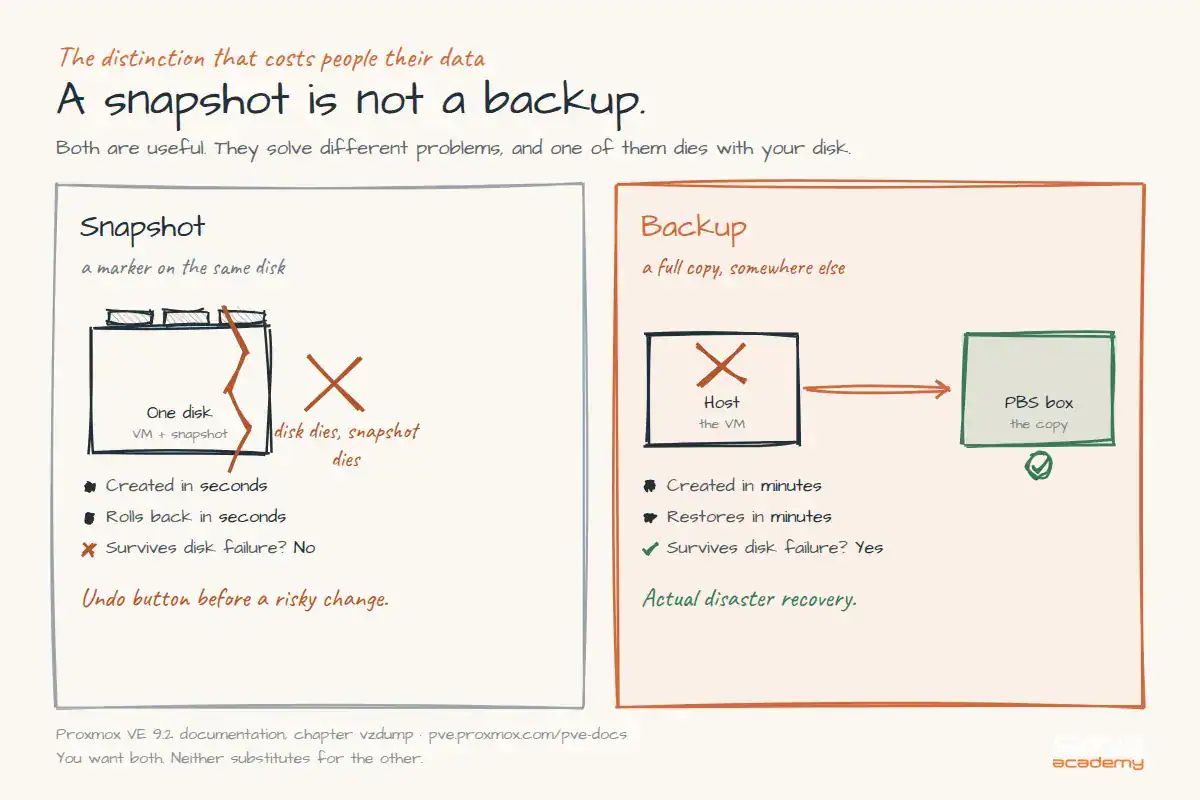
This confusion costs people their data, so it’s worth 200 words to settle it.
A snapshot is a point-in-time marker on the same storage as the VM. It’s near-instant, costs almost nothing to create, and lets you roll back in seconds. Perfect for “I’m about to upgrade this thing and I want an undo button.”
A backup is a full copy written to separate storage. Slower, costs real space, and survives things a snapshot can’t.
| Snapshot | Backup | |
|---|---|---|
| Where it lives | Same storage as the VM | Separate storage or server |
| Speed to create | Seconds | Minutes to hours |
| Space cost | Small, grows with changes | Full copy, then dedup helps |
| Survives disk failure | No | Yes |
| Survives host loss | No | Yes, if off-host |
| Rollback speed | Seconds | Minutes |
| Good for | Undo before a risky change | Actual disaster recovery |
The line that matters: a snapshot dies with the disk it lives on. If your SSD fails, every snapshot on it fails too. That’s the entire difference, and it’s why “I take daily snapshots” is not a backup strategy.
You want both. Snapshot before you upgrade a VM, as covered in Part 1’s post-install checklist. Back up nightly to somewhere else. They solve different problems and neither substitutes for the other.
Two more things about snapshots worth knowing before you lean on them.
They cost performance if you keep them. A snapshot makes the storage track changes since that point, so a snapshot you forgot about six weeks ago is still doing bookkeeping on every write. Take them before risky changes, delete them once the change is proven.
On ZFS and LVM-thin they can fill your pool. The snapshot holds the old blocks so they can’t be freed. Change enough data and a full-looking pool is really a pile of stale snapshots. Worth checking whenever storage usage climbs without new data to explain it.
The habit that works: snapshot, make the change, verify, delete the snapshot. Same day.
Install the guest agent first
Before scheduling anything, install the QEMU guest agent in your VMs. It’s the difference between a backup that boots and a backup that might.
Without it, a snapshot-mode backup is crash-consistent: the equivalent of yanking the power cord and imaging the disk. Usually recoverable. Sometimes not, especially with a database mid-write.
With the agent, Proxmox calls guest-fsfreeze-freeze and guest-fsfreeze-thaw around the snapshot, flushing pending writes and quiescing the filesystem. That gets you a filesystem-consistent backup.
Inside a Debian or Ubuntu guest:
apt-get install qemu-guest-agent
systemctl enable --now qemu-guest-agent
Then enable it on the VM from the Proxmox host:
qm set 100 --agent 1Or tick QEMU Guest Agent under the VM’s Options tab. The full option syntax is:
agent: [enabled=]<1|0> [,freeze-fs=<1|0>] [,fstrim_cloned_disks=<1|0>] [,type=<virtio|isa>]freeze-fs defaults to 1, so filesystem freezing is on once the agent is enabled and running. Worth knowing: older tutorials reference freeze-fs-on-backup, which is now a deprecated alias for freeze-fs. Use the current name.
Two halves have to line up: the agent option enabled on the VM in Proxmox, and the qemu-guest-agent service actually running inside the guest. Get one without the other and you have a VM Proxmox thinks it can freeze, with nothing listening.
Test it before you trust it. Communication runs over a Unix socket at /var/run/qemu-server/<vmid>.qga, and the Proxmox guest agent wiki gives you a one-line check:
qm agent 100 pingPer the wiki, “if the qemu-guest-agent is correctly runnning in the VM, it will return without an error message.” So silence means success. An error means your snapshots are still crash-consistent no matter what the checkbox says.
Run this on every VM you care about, because a backup job reports success either way. Nothing warns you that a freeze never happened.
The agent buys you a few other things beyond backup consistency. Proxmox can read the guest’s IP addresses and show them in the UI, shut the guest down gracefully instead of pulling virtual power, and run fstrim after a disk move so thin-provisioned storage actually reclaims space.
Windows guests need the virtio-win ISO. Install the virtio-serial driver through Device Manager (it shows up as “PCI Simple Communications Controller”), then run qemu-ga-x86_64.msi from the guest-agent folder. Proxmox uses VSS on Windows with backup type VSS_BT_FULL by default. If you run another backup product inside the guest, switch to VSS_BT_COPY so you don’t break its chain.
Running a database? Linux guests can hook the freeze event with scripts in /etc/qemu/fsfreeze-hook.d/, which is the documented way to flush a database to a consistent state mid-backup.
Schedule a backup job
Go to Datacenter → Backup → Add. Pick your VMs, a storage target, a schedule, and compression.
On compression: the three algorithms are lzo, gzip, and zstd, and the docs say “Zstandard (zstd) is the fastest of these three algorithms” with multi-threading as another advantage over lzo and gzip. Pick zstd.
One precise note, since it gets misreported: the config schema default is compress: 0, meaning off, even though the web UI preselects ZSTD for new jobs. Set it deliberately rather than assuming.
For thread control:
zstd: <integer>     # 0 uses half your cores, N uses N threads
pigz: <integer>     # parallel gzip, 1 uses half your cores
Schedule syntax
Proxmox uses a systemd-style calendar format:
[WEEKDAY] [[YEARS-]MONTHS-DAYS] [HOURS:MINUTES[:SECONDS]]Shorthands cover most needs: hourly, daily, weekly, monthly, yearly, quarterly, semiannually. Omitted fields default to *.
Verified examples from the calendar events docs:
| Schedule | What it means |
|---|---|
daily | Every day at 00:00 |
02:30 | Every day at 02:30 |
mon..fri | Every weekday at 00:00 |
sat..sun 03:00 | Weekends at 03:00 |
mon..fri 8..17,22:0/15 | Weekdays, every 15 min from 8-18h and 22-23h |
*-05 | The 5th of every month |
Sat *-1..7 15:00 | First Saturday of each month at 15:00 |
*/5 | Every five minutes |
For a homelab, daily at 02:30 is a sensible default. Nothing’s running, and you’ll be asleep when it fails.
Retention, and the rule everyone misunderstands
Retention lives under prune-backups:
prune-backups keep-last=3,keep-daily=13,keep-weekly=8,keep-monthly=11,keep-yearly=9Options are keep-all, keep-last, keep-hourly, keep-daily, keep-weekly, keep-monthly, and keep-yearly. Setting keep-all=1 conflicts with everything else.
Here’s the part that catches people, quoted exactly:
“Each option only covers backups within its time period. The next option does not take care of already covered backups. It will only consider older backups.”
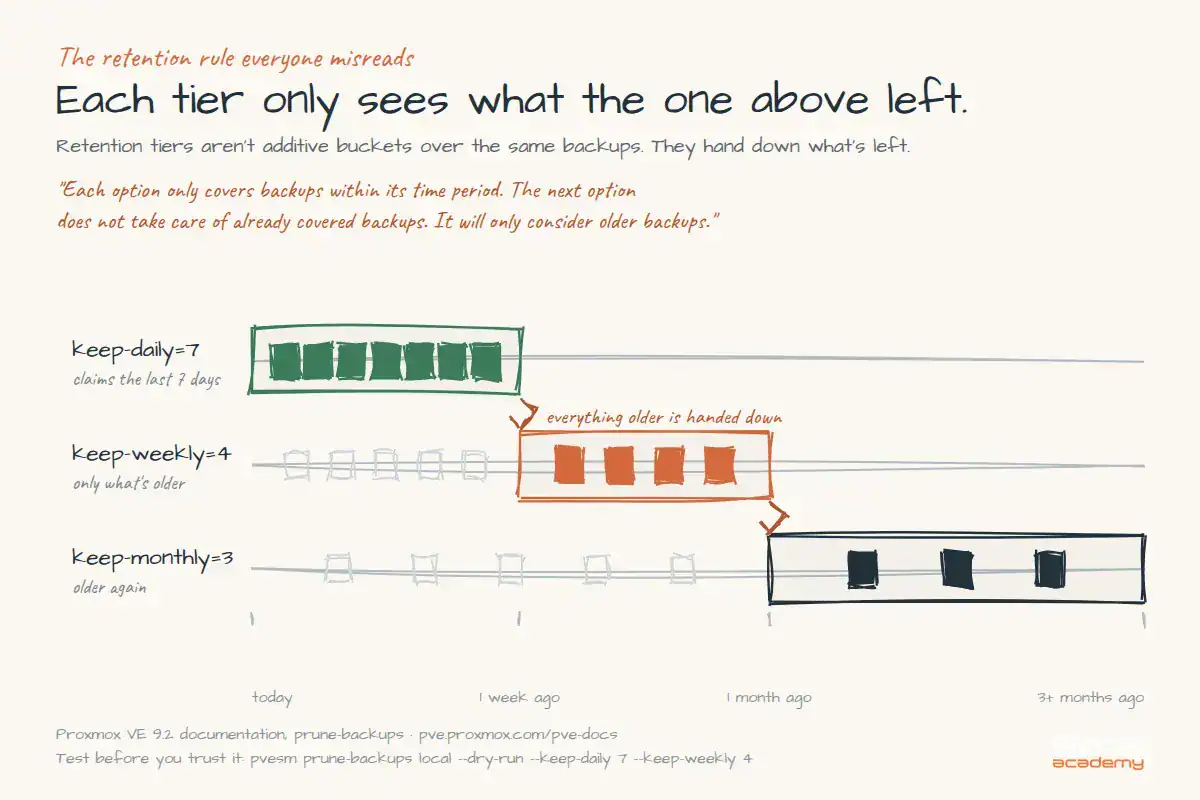
So these aren’t additive buckets over the same set of snapshots. Each tier only looks at backups older than what the previous tier already claimed, and within each time bucket only the latest is kept.
That’s why people set what looks like generous retention and end up with fewer backups than expected, or set something modest and watch their disk fill anyway.
A workable homelab starting point is keep-daily=7,keep-weekly=4,keep-monthly=3: a week of dailies, a month of weeklies, a quarter of monthlies. Adjust once you see real disk consumption over a few weeks.
Why that shape? It matches how people actually discover problems. Something you broke yesterday needs a daily. Something that’s been quietly corrupting for a month needs a monthly. The weeklies bridge the gap where you notice a file is wrong but can’t say when it went wrong.
That’s the question worth asking before you pick numbers: how far back would you need to go to escape a problem you haven’t noticed yet? Ransomware, a bad config change, a slow database corruption. If your answer is “a month” and your retention is seven dailies, your retention is wrong regardless of how much disk you have.
Test your policy before trusting it. On the PVE side:
pvesm prune-backups local --dry-run --keep-daily 7 --keep-weekly 4The docs describe --dry-run as “Only show what would be pruned, don’t delete anything.” The PBS client has the same flag, and its docs put it plainly: “You can use the –dry-run option to test your settings. This only shows the list of existing snapshots and what actions prune would take.”
Output is a table of every snapshot with a keep column, 1 or 0. Cheaper than discovering the tier rule the hard way.
Also useful: “Old unfinished or incomplete backups will be removed by the prune command, unless they are newer than the last successful backup.” Failed jobs clean themselves up.
I’d avoid claiming a specific default retention. The docs don’t publish one, so set it explicitly rather than trusting an inherited value.
Notifications
Proxmox has a centralized notification system built on targets (where alerts go) and matchers (which alerts route where). Target types include Sendmail, SMTP direct to a relay with no local MTA needed, Gotify, and Webhook.
Matchers filter on match-severity (info, notice, warning, error, unknown), match-calendar, and match-field, with mode set to all or any.
This framework arrived in PVE 8.1, not 9.x, which is worth stating correctly since plenty of posts credit it to 9.0. Config lives in /etc/pve/notifications.cfg, with credentials in the root-only /etc/pve/priv/notifications.cfg.
Set up a target that reaches you and a matcher on error severity. A backup job silently failing for six weeks is the classic homelab story, and it’s always discovered on the day you need a restore.
Running it by hand
vzdump 100 --mode snapshot --compress zstd --storage localKey options: --mode, --compress, --storage, --bwlimit in KiB/s, and --notes-template which supports {{cluster}}, {{guestname}}, {{node}}, and {{vmid}} placeholders. Run your first job manually and watch the task log before you trust the schedule.
Backup fleecing, for when backups slow your VMs
If backups make a VM crawl, fleecing is the fix. It was added in PVE 8.2 and hardened in 8.4.
vzdump 123 --fleecing enabled=1,storage=local-lvmHere’s the mechanism. During a backup, QEMU installs a copy-before-write filter, so when the guest writes new data, the old data the backup still needs gets sent to the backup target first. If your target is slow (a USB drive, a NAS over WiFi), the guest waits on it. With fleecing, that old data is cached to a local fleecing image instead, and the backup reads from there.
The docs are specific about the fleecing storage: “should be a fast local storage, with thin provisioning and discard support. Examples are LVM-thin, RBD, ZFS with sparse 1 in the storage configuration, many file-based storages.” Costs extra space, buys guest responsiveness.
So the trade is disk for latency. Without fleecing, a slow backup target throttles your guest. With it, the guest writes to fast local storage and the backup drains from there at whatever pace the target manages.
You’ll know you need it when:
- A VM becomes visibly sluggish during the nightly window
- Your backup target is a USB drive, a spinning disk, or a NAS over WiFi
- Something inside a guest times out during backups, like a database connection pool
You don’t need it when your backup target is a local SSD or a PBS box on gigabit. The copy-before-write path is fast enough that the guest never notices.
One constraint: it’s VM-only. Containers can’t use fleecing, so a container on a slow target has no equivalent fix. Move the target, or move the data out of the container.
Proxmox Backup Server: dedup and incremental
Plain vzdump to a local disk or NFS share works, and for one VM it’s fine. But every run writes a complete self-contained archive.
Do the maths on a 40 GB VM with ten daily backups: roughly 400 GB, minus compression, even if you changed one config file a day. That’s the problem Proxmox Backup Server solves.
PBS is free and open source under AGPL v3, with paid subscriptions buying enterprise repo access and support rather than the software itself.
What PBS actually does differently
Deduplication. PBS splits data into chunks and stores each unique chunk once. Block-based VM backups use fixed-size chunks, typically 4 MiB. File-based container and host backups use dynamically sized chunks, with boundaries found by a rolling hash the docs describe as “a variant of Buzhash which is a cyclic polynomial algorithm.”
Chunks live in <datastore-root>/.chunks/, split into directories 0000 through ffff by the first two bytes of each chunk’s checksum, preallocated at datastore creation. That’s why your backup filesystem needs to support at least 65538 subdirectories in one directory.
Dedup works across snapshots and across guests. Three Ubuntu VMs from the same template share most of their chunks, so the second and third cost almost nothing.
Incremental uploads. VMs in Proxmox VE use dirty bitmaps that track changed blocks, and since those bitmaps map to the same chunk boundaries, PBS uploads only the chunks that actually changed.
One caveat: dirty bitmaps live in the running QEMU process, so a VM shutdown or reboot loses them and the next backup re-reads the whole disk. Unchanged chunks still dedupe server-side rather than re-uploading, so you lose read time, not bandwidth or space.
Client-side encryption. AES-256-GCM authenticated encryption before data leaves the host, with TLS for all client-server traffic. Your backup server never sees plaintext.
File-level restore. Browse inside a backup and pull out one file.
What hardware does PBS need?
PBS runs on modest hardware, and where people get it wrong is the filesystem and the RAM, not the CPU.
Where to run it. Bare metal on a separate box is ideal. You can run PBS as a VM, but not on the host it’s protecting, because a host failure then takes your backups with it. A small mini PC or an old desktop with a couple of drives is a perfectly good PBS box.
RAM. The baseline is modest, but if your datastore sits on a ZFS pool, budget at least 8 GB extra for the ZFS ARC cache on top. The memory-hungry operations are verify jobs and garbage collection rather than the backups themselves, so aggressive verify schedules over a large datastore want more headroom.
Storage. The datastore filesystem must handle at least 65538 subdirectories in a single directory, because PBS preallocates 65536 chunk directories. Any mainstream Linux filesystem manages this; it’s worth knowing if you were planning something exotic.
Network. Nothing special. PBS uploads only changed chunks after the first backup, so a gigabit link is comfortable for a homelab.
For the exact published minimums, check the PBS installation docs rather than trusting a blog figure, including this one.
One port to note while you’re here: the PBS web UI listens on 8007, not 8006. Proxmox VE is 8006, PBS is 8007. Easy to mix up when you’re setting both up in one evening.
Setting up a datastore
Install PBS on separate hardware, then create a datastore:
proxmox-backup-manager datastore create store1 /backup/disk1/store1Or via the GUI at Datastore → Add Datastore. Config lands in /etc/proxmox-backup/datastore.cfg.
Set a garbage collection schedule while you’re there:
proxmox-backup-manager datastore update store1 --gc-schedule 'Tue 04:27'PBS 4.0 added native S3-compatible object storage as a datastore backend, if you want off-site without running a second server.
Connecting PBS to Proxmox VE
You need the server address, a datastore name, credentials, and the TLS fingerprint. The fingerprint is required because a fresh PBS install uses a self-signed certificate. Grab it from the PBS dashboard or:
proxmox-backup-manager cert infoThen on the PVE side:
pvesm add pbs mybackup --server pbs.homelab.local --datastore store1 \
  --username root@pam --fingerprint 09:54:ef:...:4e:3c:b2 --password
The username must include its realm, so root@pam or archiver@pbs, not bare root. In the GUI it’s Datacenter → Storage → Add → Proxmox Backup Server with the same fields.
To scan a server for available datastores first:
pvesm scan pbs <server> <username> --fingerprint <fingerprint>Turn on client-side encryption:
pvesm set mybackup --encryption-key autogenThe key is written to /etc/pve/priv/storage/mybackup.enc, root-only.
Back that key up somewhere other than the machine it protects. Lose it and your encrypted backups are unrecoverable, permanently. No support ticket fixes this, no brute force is feasible, and the backups look completely healthy right up until you try to restore one. Print it, put it in a password manager on a different machine, do both.
You can also set a master public key for recovery and print a paper key:
proxmox-backup-client key paperkey /etc/pve/priv/storage/mybackup.enc \
  --output-format text > qrkey.txt
Verify, prune, garbage collection
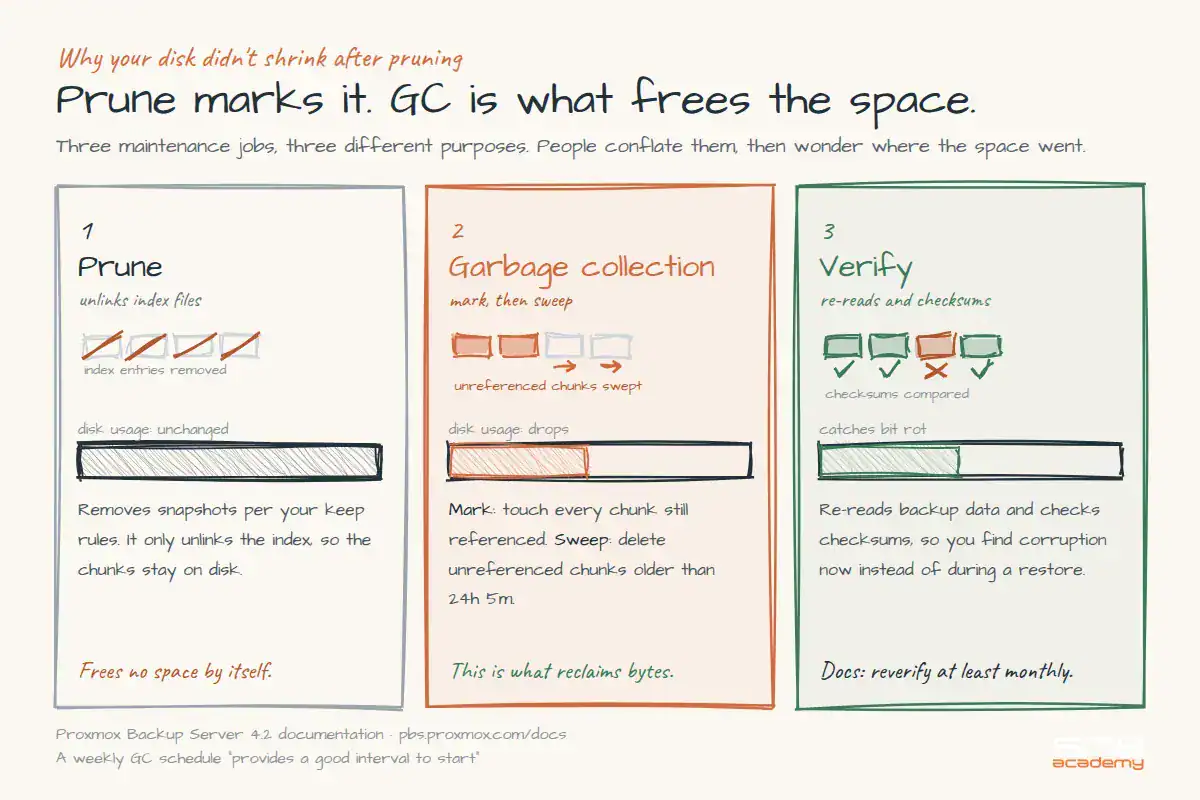
Three maintenance jobs, three different purposes. People conflate them and then wonder why disk usage never drops.
Verify jobs re-read backup data and check checksums, catching bit rot before you discover it during a restore. Options include ignore-verified to skip already-verified snapshots and outdated-after to re-check after a set period. Thread counts range from 1 to 32, defaulting to 1 reader and 4 verify threads. The docs recommend you “reverify all backups at least monthly, even if a previous verification was successful.”
Prune jobs remove snapshots per your keep rules. Important: pruning only unlinks index files. It frees no disk space by itself.
Garbage collection is what actually reclaims bytes, in two phases:
- Mark: every index file is read and the access time of each referenced chunk is updated.
- Sweep: unreferenced chunks get removed if they’re older than a cutoff, which is “either the oldest backup writer instance, if present, or 24 hours and 5 minutes before the start of the garbage collection.”
That oddly specific grace period exists because of relatime mounting, where atime only updates if the file was modified since last access or last accessed 24+ hours ago. The window has to clear that. A weekly GC schedule “provides a good interval to start” per the docs.
So the sequence is: prune marks snapshots for removal, GC reclaims the space. Watching disk usage stay flat after a prune is normal, not a bug.
Test your restore. Actually test it.
An untested backup is a rumour. This is the step everyone skips and the reason homelab horror stories exist.
Full VM restore:
qmrestore /var/lib/vz/dump/vzdump-qemu-100-2026_08_17-02_30_00.vma.zst 999Restore to a new VM ID like 999 rather than overwriting the original. You verify the backup works without destroying the running VM if it doesn’t.
Container restore:
pct restore 999 /var/lib/vz/dump/vzdump-lxc-101-2026_08_17-02_30_00.tar.zstThrottle a restore that’s saturating your network:
qmrestore <backup-file> 999 --bwlimit 50000PBS-only, and genuinely useful: live restore boots the VM immediately while data streams in behind it.
qmrestore --live-restore <backup-file> 999That one changes your recovery maths. A normal restore of a 200 GB VM means waiting for 200 GB to land before anything boots. Live restore has the service answering in a minute or two while the rest arrives in the background. Slower overall, dramatically faster to “users can work again.”
What a real restore test looks like
Here’s the loop worth running quarterly. It takes about fifteen minutes.
- Pick a VM that matters. Not the throwaway lab box. The one whose loss would actually hurt.
- Restore it to a spare ID:
qmrestore <backup-file> 999 - Change the network before booting. Set the NIC to an isolated bridge, or set
link_down=1. Two machines with the same IP and the same hostname on one network causes its own problems. - Boot it and log in. Console, not SSH, since the network is deliberately isolated.
- Check the data, not the boot. A VM that boots proves the disk image is intact. Open the database, list the files, confirm the thing you actually care about is there and current.
- Check the date of the newest data. This tells you your real recovery point, which is often older than your schedule suggests.
- Delete VM 999.
Step 5 is the one people skip, and it’s the whole point. A booting VM with an empty data volume is a passing test that would have failed you in production, and it happens whenever a bind mount or an extra mount point wasn’t in the backup.
Single-file restore
For pulling one file out instead of a whole VM, PBS gives you a File Restore button in the storage Backups tab. Container backups browse freely. VM backups show drive images first, with a part entry for the partition table and entries per partition, and PVE spins up a small temporary VM running proxmox-restore-daemon to mount the guest filesystem safely.
The limitation, quoted: for VMs “not all data might be accessible due to unsupported guest file systems or storage technologies.” Exotic filesystems, some LVM and RAID layouts, and encrypted guest volumes may not browse. There’s a CLI equivalent in proxmox-file-restore with list and extract subcommands, and it’s worth checking man proxmox-file-restore on your own install for the exact current flags.
Put a calendar reminder in for a quarterly restore test. Restore to a spare VM ID, boot it, log in, confirm your data is actually there, delete it. Fifteen minutes, and it’s the only thing that turns a backup into a guarantee.
Proxmox backup FAQ
Which Proxmox backup mode should I use?
Use snapshot mode for nearly everything. It has the lowest downtime, and installing the QEMU guest agent closes the consistency gap by freezing the filesystem during the snapshot. Pick stop mode when you need absolute consistency and can afford a brief shutdown, typically a database without freeze hooks configured. Never pick suspend: the docs describe it as a compatibility mode that suspends the VM and then calls snapshot mode anyway, so you pay downtime for no consistency benefit.
What’s the difference between a Proxmox backup and a snapshot?
A snapshot is a point-in-time marker on the same storage as the VM, so it’s near-instant and lets you roll back in seconds, but it dies with the disk it lives on. A backup is a full copy written to separate storage, which is slower and costs more space but survives disk failure and host loss. Snapshots are for undoing a risky change you’re about to make; backups are for actual disaster recovery. You want both, and neither one substitutes for the other.
Is Proxmox Backup Server free?
Yes. PBS is free and open source under the GNU AGPL v3, and you can run it on as many machines as you want with no licence cost. Paid subscriptions buy access to the enterprise package repository, official support, and the customer portal, not the software or any feature unlock. The current version is 4.2, released 2026-04-29 on Debian Trixie 13.4.
Do I need Proxmox Backup Server, or is vzdump enough?
For one or two VMs backed up to a local disk, plain vzdump is fine. PBS starts paying off around three or more guests because of deduplication and incremental uploads: vzdump writes a complete archive every run, while PBS stores each unique chunk once and only uploads changed blocks. Ten dailies of a 40 GB VM go from roughly 400 GB to a fraction of that. PBS also adds verify jobs to catch bit rot, single-file restore, and client-side AES-256-GCM encryption.
Why didn’t my disk space free up after pruning backups?
Because pruning and garbage collection are separate jobs. Pruning only unlinks index files and marks snapshots for removal, while garbage collection is what actually deletes the underlying chunks and reclaims space. GC runs in two phases, marking referenced chunks by updating their access times, then sweeping unreferenced ones older than 24 hours and 5 minutes. Set a weekly GC schedule and space will come back after it runs, not after the prune.
How much RAM does Proxmox Backup Server need?
The baseline is modest, but ZFS is the real driver: if your datastore sits on a ZFS pool, budget at least 8 GB extra for the ARC cache beyond baseline. Verify jobs and garbage collection are the memory-hungry operations rather than the backups themselves, so aggressive verify schedules over a large datastore want more headroom. Run PBS on separate hardware from the host it protects, and check the official PBS installation docs for the current published minimums rather than trusting a third-party figure.
Are LXC container backups different from VM backups?
Yes, in ways that lose data if you don’t know them. Only the container’s root disk is backed up by default, so additional mount point volumes need the Backup option explicitly enabled. Device mounts and bind mounts are never backed up at all, which surprises anyone who bind-mounted a media library and assumed it was covered. Container backups also produce tar archives rather than VMA images, and backup fleecing is VM-only.
How do I make sure my backup actually worked?
Three layers. Set up a notification target with a matcher on error severity so failures reach you instead of sitting in a task log. Schedule PBS verify jobs to re-read backup data and check checksums, monthly at minimum per the docs. Then do the one that counts: restore to a spare VM ID with qmrestore <backup-file> 999, boot it, log in, and confirm your data is there. A backup you’ve never restored from is an assumption.
Can I run Proxmox Backup Server on the same machine as Proxmox VE?
You can, and you shouldn’t for anything you care about. PBS installs on Proxmox VE as a VM or a container, which is fine for learning the interface, but a backup stored on the machine it protects dies with that machine. Disk failure, a bad upgrade, or theft takes both at once. If one box is all you have, at minimum put the datastore on a separate physical disk and copy backups off-site regularly. PBS 4.0 added S3-compatible object storage as a datastore backend, which is one way to get off-host without a second server.
How long do Proxmox backups take?
The first backup takes as long as reading the whole disk, so budget roughly the VM’s used size divided by your slowest link in the chain. After that it depends on the tool: plain vzdump re-reads and rewrites everything every run, while PBS only uploads changed chunks, which usually turns a 40-minute job into a few minutes. Two things reset PBS to a full read: a VM reboot, since dirty bitmaps live in the running QEMU process, and a first backup to a new datastore. Compression with zstd is fast enough that it rarely becomes the bottleneck.
Wrap up: your homelab is recoverable now
You picked snapshot mode and know why suspend is a trap, learned why a snapshot isn’t a backup, installed the guest agent for filesystem-consistent snapshots, scheduled a job with retention you understand, stood up Proxmox Backup Server with deduplication and encryption, and tested a restore.
That last one is what separates this from a checklist exercise.
The skills transfer directly. Backup strategy, retention policy, restore testing, and RPO/RTO thinking are what infrastructure interviews probe for, and the tooling here is the same tooling in production data centres. Our IT certification jobs in Canada 2026 report covers which roles pay for this experience.
Coming next:
- Part 4: Clustering and HA. Multiple nodes, corosync quorum, live migration, and what high availability actually requires. Also why two-node clusters are a trap, how a QDevice fixes it, and the right way to remove a node without breaking the cluster.
Before then, run one restore test. Not a backup, a restore.
If you’d rather work through backup strategy with an instructor reviewing your retention policy before it quietly eats a disk, our live Proxmox VE course runs in small cohorts. And if you’re weighing where containers fit alongside VMs in your backup plan, our Proxmox vs Docker comparison covers the difference in what you actually need to protect.
Questions about a job that won’t run or a restore that won’t boot? Comments are open.