An Ansible inventory defines every host your automation touches. IPs, credentials, groupings, connection parameters – all of it. Get your Ansible inventory wrong, and your playbooks run against the wrong devices. Or worse, they don’t run at all.
That’s the short version.
Here’s a bit more context. Whether you’re managing 5 routers or 5,000 network devices, your Ansible inventory is the foundation of every automation task you’ll ever run. It tells Ansible the “who” – which devices to connect to, how to authenticate, and how those devices are organized into logical groups.
There are two main types: static inventory (you maintain it manually) and dynamic inventory (it pulls host data automatically from an external source like NetBox). Both have their place. And picking the right one depends on the size and nature of your environment.
In this guide, we’ll break down how Ansible inventory works, compare static vs dynamic approaches, and cover the INI and YAML formats. We’ve also put together a complete reference document with all the code examples, ready-to-use config files, and step-by-step setup instructions. You can grab that at the end of this article.
What Is an Ansible Inventory?
An Ansible inventory is basically a collection of hosts and the data Ansible needs to connect to them. Think of it like a contact list for your infrastructure.
Each entry in an Ansible inventory typically includes the host’s IP address (or hostname), the network OS type, authentication details, and any custom variables you want to assign. You can also group hosts together – say, all your core routers in one group, all your firewalls in another.
Why does this matter? Because every time you run an ansible playbook, Ansible looks at the inventory to figure out where to execute tasks. No inventory, no automation. Simple as that.
Your Ansible inventory can be as basic as a flat file with a few IPs, or as complex as a dynamic system pulling hundreds of devices from a source of truth. The format and complexity depend entirely on your environment.
Sound straightforward? It is. But there are some key decisions to make – starting with whether you need a static or dynamic approach.
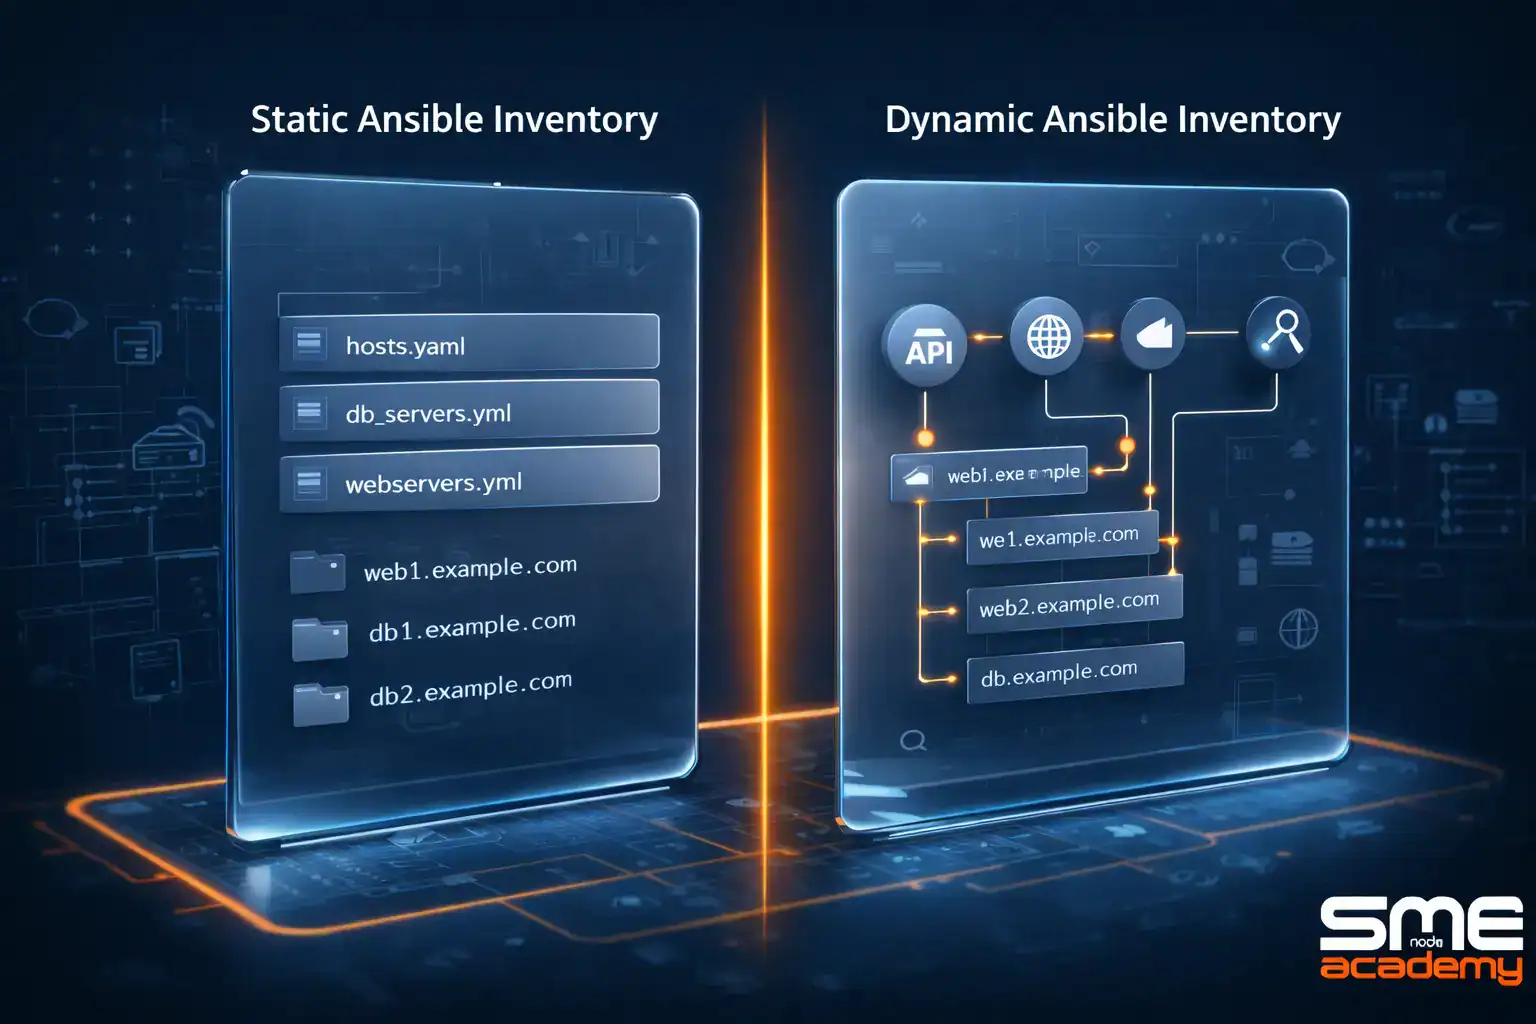
Static Inventory: When Manual Works

A static inventory is a file you create and maintain by hand. You list out every host, assign them to groups, and define variables right in the file. It’s the simplest way to set up an Ansible inventory.
Static inventories work best in small, stable environments. If your network doesn’t change much – say a handful of routers and switches that rarely get added or removed – a static inventory is perfectly fine. You write it once and update it when something changes.
The format is either INI or YAML (we’ll cover both in a minute). Either way, you’re looking at a text file with host groups, IP addresses, and connection details.
Here’s the catch.
Static inventories don’t scale well. When you’re managing dozens or hundreds of devices that change frequently, manually editing a file every time a device gets added or decommissioned becomes a real headache. That’s where dynamic inventory comes in.
Dynamic Inventory: Pull Hosts Automatically

A dynamic inventory doesn’t live in a file you maintain. Instead, it pulls host and group information at runtime from an external source of truth – like NetBox, a configuration management database, or a cloud API.
Big difference.
With a dynamic inventory, you don’t have to worry about keeping your Ansible inventory in sync with reality. Every time you run a playbook, Ansible queries the external source and gets an up-to-date list of hosts, their groups, and their variables. Automatically.
This makes dynamic inventory the go-to choice for large-scale network automation. If your organization uses a source of truth like NetBox to track devices, connecting it to Ansible means your inventory is always current. No manual updates. No stale data.
You’ve probably already noticed the pattern: small and stable means static, large and changing means dynamic. Most teams start with a static inventory and move to dynamic as their automation grows. We see this all the time in our CCIE Automation training – students come in managing static files and leave building fully automated dynamic workflows.
Static vs Dynamic Inventory: Quick Comparison

| Feature | Static Inventory | Dynamic Inventory |
| Setup | Manually created and maintained | Uses plugins to fetch hosts at runtime |
| Updates | Requires manual edits | Automatic – reflects real-time changes |
| Best For | Small, stable environments | Large, dynamic environments |
| Scalability | Limited | Highly scalable |
| Examples | INI or YAML flat files | NetBox, cloud APIs, CMDB plugins |
Ansible Inventory Formats: INI vs YAML
When building a static Ansible inventory, you’ve got two format options: INI and YAML. Both do the same job. But they look different and have different strengths.
Ansible Inventory in INI Format
The INI format is the classic approach. It’s flat, readable, and fast to set up. You define host groups using square brackets, list hosts underneath, and assign variables inline.
A typical Ansible inventory in INI format might have groups like [core_routers], [access_switches], and [firewalls] – each with their hosts and connection variables. You can also create nested groups using the :children suffix, which lets you target all network devices at once.
INI is great for quick setups. But it gets messy as your Ansible inventory grows. Nested groups, complex variables, and multi-level hierarchies are hard to express cleanly in INI.
Ansible Inventory in YAML Format
YAML gives you more structure. It’s hierarchical by design, which makes it easier to organize complex Ansible inventory files with lots of groups, variables, and nested relationships.
The same groups and hosts from the INI example translate into a YAML tree with clear parent-child relationships. Variables sit neatly under each host or group. And because YAML is a standard format, you can run linting tools on it to catch syntax errors before they cause problems.
For teams working with CI/CD pipelines, YAML is usually the better choice. It validates more easily and plays nicely with version control.
So which should you pick? Here’s a quick breakdown.
| Aspect | INI Format | YAML Format |
| Readability | Simple and flat | Structured and hierarchical |
| Complex Variables | Gets cluttered | Handles them cleanly |
| Validation | No built-in linting | Supports YAML linting tools |
| CI/CD Friendly | Limited | Yes – standard format |
| Best For | Small, simple inventories | Larger, complex setups |
How Does NetBox Work as a Dynamic Inventory Source?
NetBox is one of the most widely adopted sources of truth for network infrastructure. And it integrates directly with Ansible as a dynamic inventory source through the NetBox Ansible collection.
Here’s how it works at a high level.
You install the NetBox Ansible collection, set your API endpoint and token as environment variables, and create a YAML configuration file. That config file tells Ansible which devices to pull from NetBox, how to group them, and what variables to compose from NetBox attributes.
The key configuration parameters include things like query filters (to narrow down which devices get pulled), group_by settings (to organize hosts by role, type, or site), and compose rules (to map NetBox data fields to Ansible variables like ansible_network_os).
Once configured, your Ansible inventory updates itself every time you run a playbook. Add a new device in NetBox, and it shows up in your next Ansible run. Decommission one, and it disappears. No file edits needed.
Pretty powerful, right?
The setup involves a few steps – installing the collection, configuring environment variables, writing the config YAML, and testing with the ansible-inventory command. The code isn’t complicated, but getting the details right matters.
Want the Complete Ansible Inventory Reference?
- Complete static inventory code (INI + YAML) – ready to use
- Full NetBox dynamic inventory config with every parameter explained
- Working playbook examples with –limit filtering
- ansible-inventory command reference with real output examples
- Decision flowcharts for choosing static vs dynamic
Get the Free PDF
Enter your email to download instantly.
How to Filter Your Ansible Inventory
Running a playbook against your entire Ansible inventory isn’t always what you want. Sometimes you need to target a specific host, a single group, or everything except a particular set of devices.
That’s what the –limit flag is for.
The –limit option lets you restrict ansible playbook execution at runtime without changing your Ansible inventory file. You can target a single host, a group, multiple groups, use wildcards, or even exclude specific hosts.
Here are some common use cases:
| Use Case | What It Does |
| –limit router1 | Runs only on router1 |
| –limit access_switches | Runs on the entire access_switches group |
| –limit “router1:fw1” | Runs on router1 and fw1 |
| –limit “!firewalls” | Runs on everything except the firewalls group |
| –limit “router*” | Runs on all hosts starting with router |
The –limit flag combined with the ansible-inventory command is also great for debugging. You can use ansible-inventory –graph to see a tree view of your groups and hosts, or –list for a detailed JSON dump with all host variables.
This becomes really valuable when working with dynamic inventory sources. You pull your hosts from NetBox, then use –limit to narrow down execution to exactly the devices you need. That’s precision control.
In our CCNA Automation course, students learn these Ansible inventory filtering techniques hands-on with real network topologies. It’s one of those skills that saves hours once you start automating at scale.
Why Your Ansible Inventory Setup Matters for Network Automation
Your Ansible inventory isn’t just a config file. It’s the single source of targeting truth for every automation task in your environment.
Get it right, and your playbooks are clean, predictable, and scalable. Get it wrong, and you’ll spend more time troubleshooting targeting issues than actually automating anything.
Here’s what we’ve seen across hundreds of students in our live network automation training:
Teams that start with a well-structured Ansible inventory – even a simple static one – scale their automation much faster than those who just throw IPs into a flat file without any organization. Host groups matter. Variables matter. And the choice between static and dynamic inventory should match your operational reality.
If you’re just getting started with network automation, a static YAML Ansible inventory is a solid first step. As your environment grows, transitioning to a dynamic inventory with NetBox keeps everything in sync.
And if you want to go deeper into automation tooling beyond Ansible – things like Terraform, CI/CD pipelines, and infrastructure as code – our CCIE Automation program covers the full stack with live expert instructors and unlimited lab access.
Frequently Asked Questions
What is the difference between static and dynamic Ansible inventory?
A static Ansible inventory is a manually maintained file (INI or YAML) where you list hosts and groups yourself. A dynamic inventory pulls that data automatically from an external source like NetBox at runtime. Static works for small environments, while dynamic suits large or frequently changing networks.
Can I use both static and dynamic Ansible inventory together?
Yes. Ansible supports multiple inventory sources in a single run. You can combine a static Ansible inventory file with a dynamic inventory plugin. Ansible merges them together, giving you flexibility to manage some hosts manually and others dynamically.
Which Ansible inventory format should I choose – INI or YAML?
For simple setups, INI is quick and readable. For anything with complex groupings, nested variables, or CI/CD integration, YAML is the better choice. Most teams working with network automation prefer YAML because it validates more easily and handles hierarchy well.
How do I test my Ansible inventory before running a playbook?
Use the ansible-inventory command. Run ansible-inventory –graph to see a tree view of your groups and hosts, or ansible-inventory –list for a detailed JSON dump with all variables. Both are great for verifying your Ansible inventory setup, especially with dynamic sources.
Do I need NetBox to use a dynamic Ansible inventory?
No. NetBox is one of the most popular options, but Ansible supports dynamic inventory plugins for many platforms – cloud providers like AWS and Azure, CMDBs, and other APIs. NetBox is especially popular for network automation because it’s purpose-built for tracking network infrastructure. If you’re interested in how Ansible fits into a larger automation and DevOps workflow, our CCNA Automation course covers the full picture from inventory setup to CI/CD integration.
Bottom Line
Your Ansible inventory is where all network automation starts. It defines what gets automated, how Ansible connects, and how your devices are organized. Without a solid Ansible inventory, everything else falls apart.
Start simple. A static YAML file works fine for small environments. As you scale, move to a dynamic inventory with NetBox or another source of truth. Learn –limit to control execution precisely. And structure your host groups in a way that matches how you actually operate your network.
The concepts aren’t hard. But the details matter. And the best way to learn is by doing.
Don’t Leave Without the Complete Guide
- All code examples – copy, paste, and run
- Full NetBox integration setup – every step, every parameter
- Every –limit pattern with real commands and outputs
- Static vs dynamic decision flowcharts
- ansible-inventory command cheat sheet
Get the Free PDF
Enter your email to download instantly.